A guide to beginning Pokémon fangame development in RMXP
An overview of the basic principles of fangame design using the Pokémon Essentials mod for RPG Maker XP.
Eventing
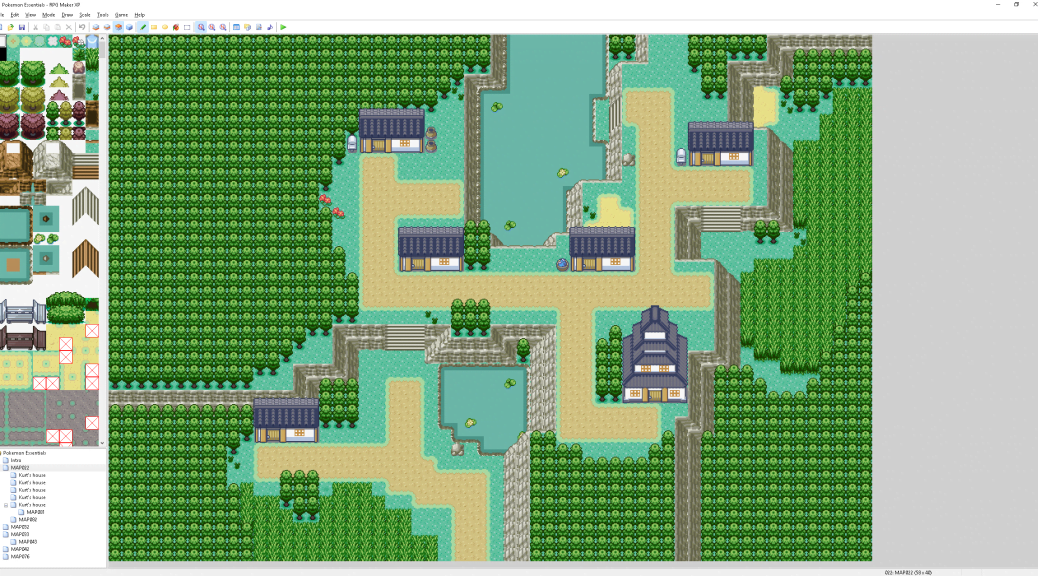
Our map is nice, but it’s just a little empty! Let’s fill it up with some people and events to give it some life. Switch to the Events layer by pressing F8 or going to Mode -> Events in the dropdown menus. Your map now has a grid over it! Double-click on a grid square to create an event on that tile.
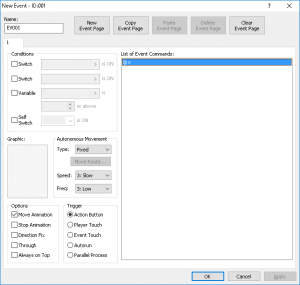 Event Editor

A wild event editor appeared! This thing isn’t as complicated as it might seem at first. Let’s go through it piece by piece.
- Name: The name of your event on the map. Try to make them descriptive!
- Conditions: The states that must be enabled in order for this event to exist. Can use switches, which are binary on/off toggles, variables, which are used to store numbers, or self switches, which are local variables specific to one particular event. If you leave all of these unchecked, the event will appear no matter what.
- Graphic: The sprite on the map that corresponds to the event, such as an NPC overworld sprite. You can leave this empty to create cutscenes.
- Autonomous Movement: Defines the “idle” movement that the NPC will perform when not being spoken to. Defaults to none, but can be set to random, moving towards the player, or a custom path.
- Options: Allows you to enable special modes for the event, such as being able to pass through walls, always appearing on the top layer, or walking without a movement animation.
- Trigger: Sets the action that will cause the event to run. Usually best left at “action button”, which will trigger when the event is spoken to, but needs to be set to “player touch” to create cutscenes.
- Event Pages: Allows you to place multiple events or versions of the same event on the same tile. Different event pages can be set to display with different conditions, such as turning on Self Switch A to switch to the second page of an event. If two event pages have the same conditions, the page with the higher number will take precedence.
Event Commands
“Cool but.. how do I actually make my event do something,” you may be wondering. Have a look at your empty List of Event Commands section and double click the empty box to find a new menu – a list of actions that can be added to your event!
We’ll only go over a few of the most useful event commands because there are three pages of them, and on top of that, many of them are intended for use in a Vanilla-style RPG Maker game and do nothing at all (or worse, break the game) when used in Pokémon Essentials. Some of the options on this menu can also be done in better alternative ways with Ruby scripting, and they will be listed on the next page.
- Show Text: Draws a textbox on the screen, used for NPC dialogue.
- Wait: Creates a delay of a set number of frames.
- Conditional Branch: Creates a branch in the event actions depending on certain conditions.
- Transfer Player: Teleports the player around the map, or two a different map altogether.
- Set Move Route: Allows you to create automatic movement for an NPC or the player.
- Wait for Move’s Completion: Must be used following a Set Move Route in order to stop the game from proceeding in the event without waiting for the movement to finish.
- Script: Allows you to fill in your own Ruby code to be run. We’ll be checking this out on the next page!
Common Events
Common Events are global events that can be run from anywhere in the game. To create one, open up your database again and switch to the Common Events tab to find a list of existing ones. You can create a new one with event commands in exactly the same way as you would a normal event.
You can use a Common Event from a normal event by adding in the “Call Common Event” event command. More frequently, Common Events are used in Pokémon Essentials scripting, such as Pokégear phone calls, where calling certain NPCs will trigger an interaction defined in a Common Event. Have a look at Common Event #1: “Professor Oak phone” for an example.