A guide to beginning Pokémon fangame development in RMXP
An overview of the basic principles of fangame design using the Pokémon Essentials mod for RPG Maker XP.
Mapping
You probably already noticed the map editor in the front and center of RMXP’s user interface. Let’s have a quick look through the different menus and interfaces we’ll have to interact with when mapping, and after that we can start creating our first town!
Map Editor
Tileset
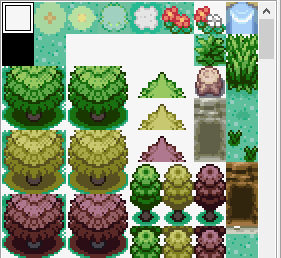
The tileset takes up most of the left sidebar in RPG Maker. Here we can see all the tiles we inserted on the previous page of this tutorial. Now that we’ve got them, we can start using them in some maps!
Click to select a tile, click and drag to select multiple tiles at a time.
Map List
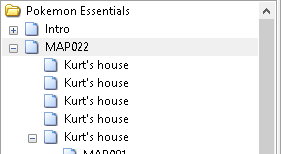 In the bottom left corner of the screen you’ll find a list of your maps. You can highlight one and press the spacebar to edit its properties – like the name, size and music. Maps can also be nested, which allows you to click the plus and minus icons to show or hide map groups.
You can also delete maps from this menu. Make sure you don’t delete the “Intro” map though! That’s your spawnpoint and deleting it may cause issues.
View
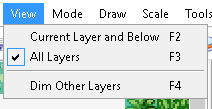 Shows or hides certain layers in the map. You can switch between showing all layers normally or highlighting the active layer and dimming others, which is extremely useful when mapping. You can also set the map editor to only show layers at or below the level of the active one. This last feature is useful for taking pictures of your maps without showing all the events – simply select Layer 3 and use the View menu to hide layers above that.
Mode
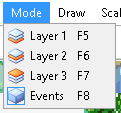
RPG Maker maps have three different layers for tiles and one layer for events. Having multiple map layers allows you to create overlapping elements and more complicated maps. Whereas other mapping tools like Advance-Map make you set up multiple layers inside a Tileset Editor and restrict the map editor to a single layer, RMXP lets you freely use three layers when mapping.
The exact details of what goes on each layer can vary by mapper and even by map, but generally a system like this is preferable:
Exterior
- Grass, flowers, paths, stone.
- Trees, lamp posts, benches, signs, rocks, mountains, other miscellaneous decorations.
- Buildings, treetops.
Interior
- Floors, walls, carpet.
- Tables, windows, chairs, decoration items.
- Items on tables like books and food.
Draw
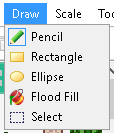
RPG Maker has five tools for drawing. These should be intimately familiar to anyone who has used any image editing tools, as the functionality is identical.
- Pencil lets you place a single tile. This is the one you’ll be using most of the time.
- Rectangle allows you to drag to place a large group of tiles.
- Ellipse is identical to rectangle except that it creates a circular or oval shape.
- Flood Fill is another name for the Paint Bucket tool in image editors. It will fill the largest possible space of identical tiles.
- Select allows you to highlight tiles to cut, copy, paste, or delete.
Scale

This one’s pretty easy. You can click on the options to change the map’s zoom level. This does not affect in-game scale – it only changes how the map displays in the editor.
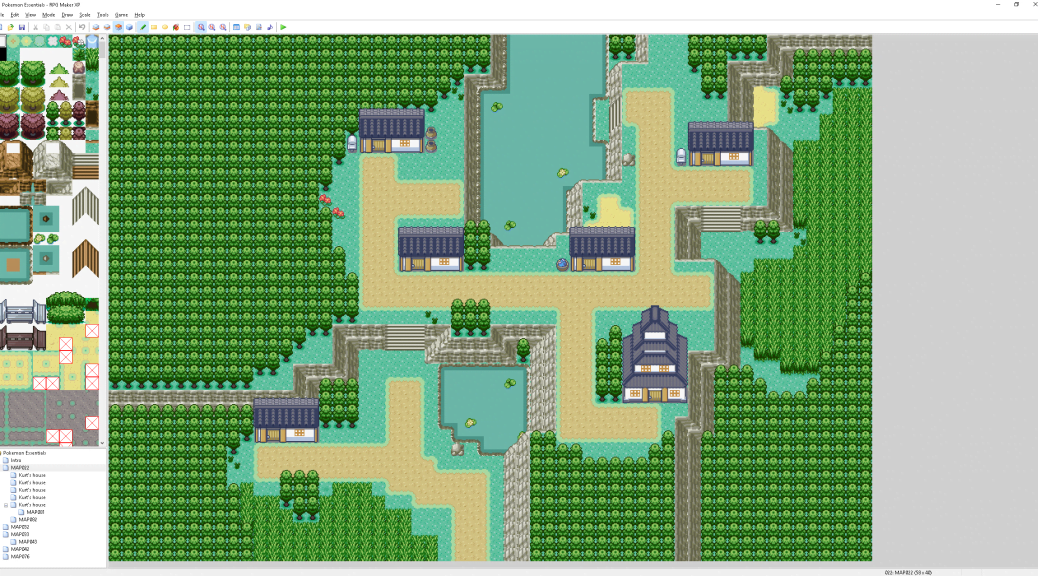
Mapping Practice
A full tutorial on mapping techniques, as well as common pitfalls, will have to wait until a future article, as it’s beyond the scope of a general tutorial such as this one. However, we can have a quick look at a town I made and the various stages of design it went through.

- Our blank canvas has been created! It’s just filled with grass at the moment.
- It’s important to place trees (and/or mountains) first, as they typically define the shape of the map.
- I put down houses to give myself an idea of where the paths should connect and which areas should be side areas. I also expanded the trees a little bit to reduce excess empty space.
- Expanded the trees a bit more and also moved the lab closer to the top right houses so that the path needn’t be so long. I added a pond to fill the middle left space, and placed paths connecting the buildings.
- The finishing touches! Added the tops to the trees and made sure to shade them all correctly, added details such as flowers, signs, lily pads, stumps, and small trees.
This map is far from perfect; there’s a lot more that could be done with it given time, but such things will have to wait until a separate in-depth mapping tutorial. Mapping really is something that can only be mastered through trial and error, and through forging your own style instead of cloning that of others. Take the time to experiment and make something unique!