A guide to beginning Pokémon fangame development in RMXP
An overview of the basic principles of fangame design using the Pokémon Essentials mod for RPG Maker XP.
Choosing Our Graphics
Before we begin creating our world, it’s important to plan out the game’s graphical style. Of course, we can (and will) make minor tweaks as we progress, but we want to have the basics figured out before we start mapping. What kind of visual theme do we want? Let’s look at the common choices.
Gen 3 Style
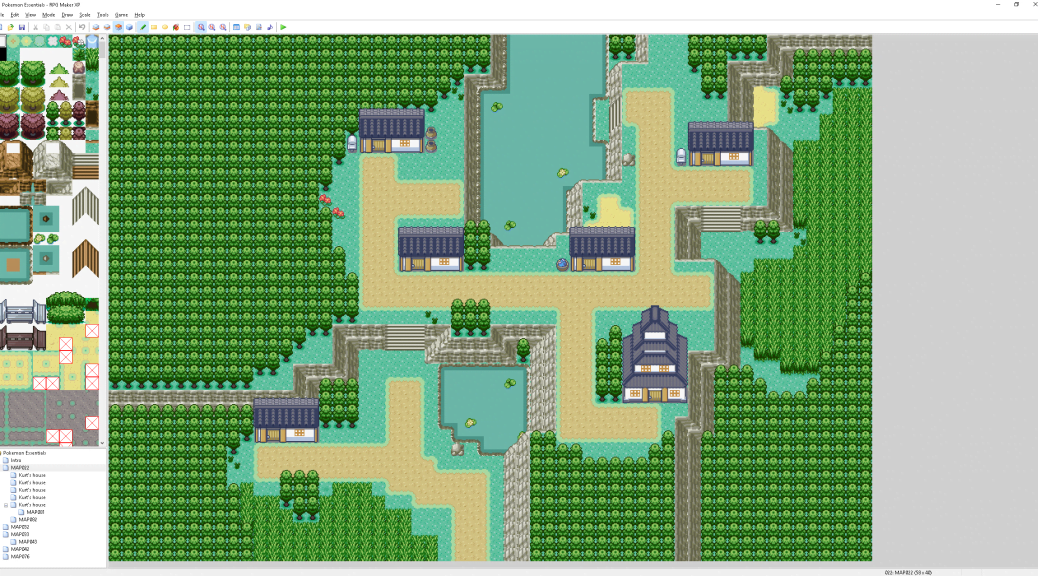
Games visually similar to Gen 3 are still popular, even as the main series Pokémon games take huge steps ahead in terms of graphical fidelity. When it comes to making fangames, however, going with Gen 3 styled graphics is certainly a good choice. Pokémon Essentials comes with an FRLG (FireRed & LeafGreen) tileset out of the box and additional resources are plentiful online.
A lot of tiles from RSE (Ruby, Sapphire & Emerald) can also be mixed in, such as in the above screenshot where I’ve added in recolored versions of Emerald grass, small trees, and leafy secret bases. In general it’s a good idea to be cautious when mixing up tiles from different games, as the clash of art styles often looks bizarre, but many of RSE’s nature tiles make a great compliment to FRLG graphics.
We’ll be using the tileset in the above screenshot for the majority of this guide, but let’s take a quick look through three more available options.
Gen 4 Style

Gen 4 alone is probably the least popular of the options that will be presented here. More often Gen 4 overworlds and buildings are mixed in with Gen 5 nature tilesets to create an interesting combination, but Gen 4 on its own does not seem to be a hit among fan game developers. That’s not necessarily a bad thing though! If you’re looking to make something that sets you apart from the norm, Gen 4 style is probably worth a try.
Gen 5 Style
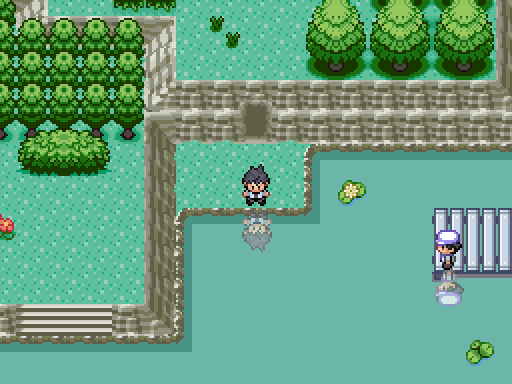
This is certainly the most popular style among developers at the moment. Gen 5’s tiles are widely available, and modified versions can be found in abundance. However, I’d urge caution before you sign on – many of the Gen 5 tileset resources that can be found online are poorly ripped from a 3D game to be used in a 2D one, so most of the time the result ends up looking messy and badly resized. Take the time to find proper tiles, make sure they have not shrunk or stretched horribly, and this could just look great.
I’d also recommend using Gen 4 overworld sprites with your Gen 5 tiles. Gen 5’s overworld sprites are quite tall and distorted, and though they can just barely fit in with the pixelated 3D graphics of B/W/2, they look alien in the 2D world of RPG Maker XP. Have a look at Professor Juniper in the above screenshot! Looks weird, huh?
Custom Style
Those were all interesting but… you’re a creative snowflake and you don’t want to be bound to styling your game based on the works of Game Freak, or artists mimicking their work. You want something unique for your game. That’s great! Sadly there aren’t many artists who make tilesets that don’t adhere to one of the three above categories, so your options are limited. If you have some artistic talent of your own you can make the tiles yourself, or commission a pixel artist to do so. You can also do some searching to find existing Custom Style tiles – a great place to start is Magiscarf, whose public work doesn’t easily fit into any of the above three styles.
If you do take the approach of searching for tiles made by other artists, make sure you’re completely certain that the tiles you choose are public and give credit to the creator! Making graphics takes a lot of time, dedication, and love, so it’s important to respect that.
Inserting Tiles
This is a breeze. Open up your game folder and head into the Graphics/Tilesets directory, then open up the tileset you want to edit in the image editor of your choice – preferably something other than MS Paint, as it will destroy the background transparency on the image. Note that RPG Maker uses tiles scaled up to twice their original size (a tile is 32 x 32), so you must account for that when inserting them. Once you’ve made the changes you want, save the file, head back into RPG Maker, and press F9 to open the database and get your tiles set up.
Setting up Tiles
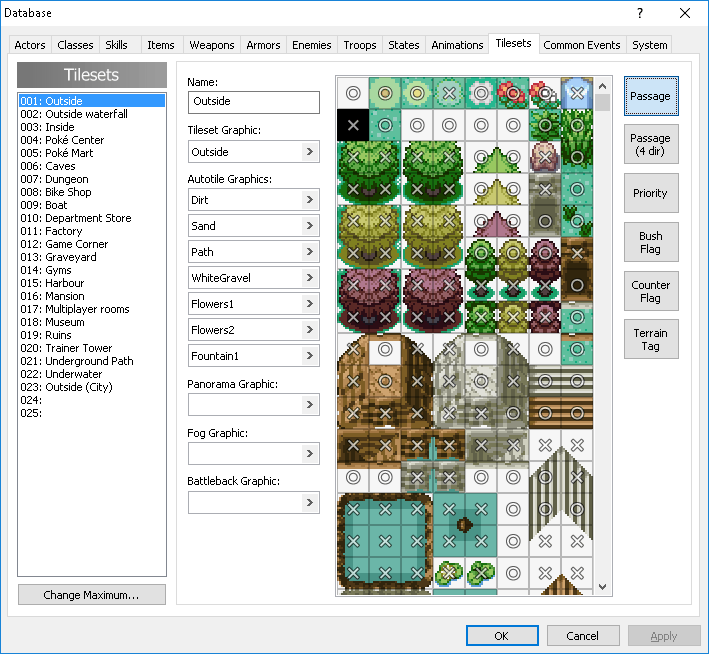
RMXP’s tileset database can seem daunting, but it’s not too hard to get the hang of quickly. On the left is the list of tilesets. In this tutorial we’ve inserted some tiles into our main Outside tileset, and we’re going to get them set up in the database. Take note of the buttons along the right of the menu, those are what we’re going to be using to define the properties of our tiles.
- Passage allows you to toggle the impassibility of a tile. A circle means it can be passed through, an X means it cannot.
- Passage (4 dir) is similar but slightly more complicated – it allows you to set passage in all four directions off of a tile.
- Priority defines which tiles should appear above the player. Generally all priorities should be null except for tiles like the tops of trees and the backs of houses, which the player can walk behind.
- Bush Flag is used for tall grass and similar tiles. It allows the tile to cover the lower half of the player, as though they’re standing in shrubbery or grass.
- Counter Flag allows the tile to act as a counter, over which the player can interact with events behind the counter. An example would be a shopkeeper, standing behind a counter, who can nonetheless be spoken to.
- Terrain Tags allow you to change the behavior of tiles and create custom functionality. These are more complicated to use and customize than any other item on this list, and as such Terrain Tags and their customization will be the subject of another, separate tutorial in the future. For the time being, you can see this list of Terrain Tags that exist in Pokémon Essentials by default.
Now that we’ve gotten our tiles into the game, and they’re relatively functional, it’s time to move on to…