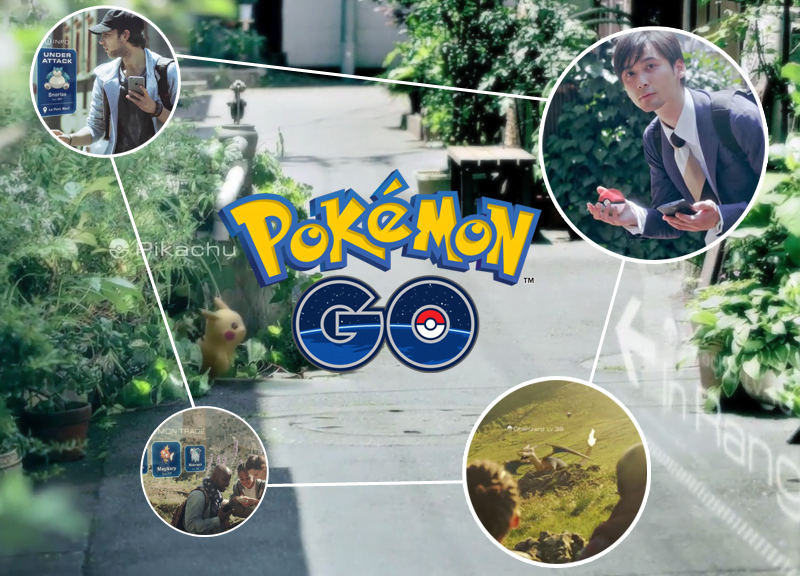
A Guide to Pokémon GO
Find out the basics of Pokémon GO, including how to quickly get to level 5 and get into the Teams and Gym battles!
For those who are just starting with the game Pokémon GO, we’re compiled a guide here for you to check out! Find out what all the fuss is about and how you can get quickly into the main part of the game.
What is Pokémon GO?
The game revolves around catching Pokémon you encounter by using your mobile phone. Walk around in the real world and keep an eye out for any Pokémon that will appear as you observe the Google-Map-esque layout! The more you catch, the higher your trainer level increases, and in turn the rarer and stronger Pokémon you can encounter. You can also gain the ability to evolve your Pokémon if you have enough of the same species obtained. Meanwhile, what Pokémon you can encounter depends largely on your location. Walk near a beach, and you’ll find more Water types, for example.
You can also take over Gyms. Places of import in the real world serve as such locations. You can place a Pokémon you caught at these locations to ‘defend’ the location against other players. You’re not alone however! You can join one of three teams, and other teammates can help you to either defend your team’s Gyms, or take down opposing Gyms (or even take control of them).
An important note is that currently you can only obtain first generation Pokémon (151 – Bulbasaur to Mew, presumably). Updates are regularly made to Pokémon GO however – roughly one every two weeks. Therefore we can expect more Pokémon from the newer generations down the track.
For more information about the game, check the support site!
Starting Out
The game gives you what is a fairly quick tutorial, which you can watch below. You get a few token Poké Balls from this professor Willow fellow, and then get to fight a Pokémon of your choosing from Bulbasaur, Squirtle and Charmander. This gives you a basic idea on what catching Pokémon is like. Choose whichever one you like best! You can encounter the others later in the wild. Personal experience suggest Charmander is rarer for what it’s worth.
If you choose to walk around away from the three starter Pokémon, you can instead encounter a Pikachu to start off with.
What next?
Ideally you’ll want to hit level 5, as from that point you can join a team and get into the Gym battles.
How do you level up your trainer? It comes down to catching Pokémon – your trainer gains experience (or ‘XP’) each time you catch a Pokémon. You can also gain experience by training your Pokémon at Gyms, but to do that you need to reach level 5 first. Visiting PokéStops helps too, but you only get 50 XP from spinning PokéStops, so the quicker way at first is to catch Pokémon. (That said, a tenth PokéStop visited in a half-hour gets you 100 XP).
You get 100 XP for catching any Pokémon, and a 500 XP bonus for catching one you haven’t yet caught.
Catching Pokémon
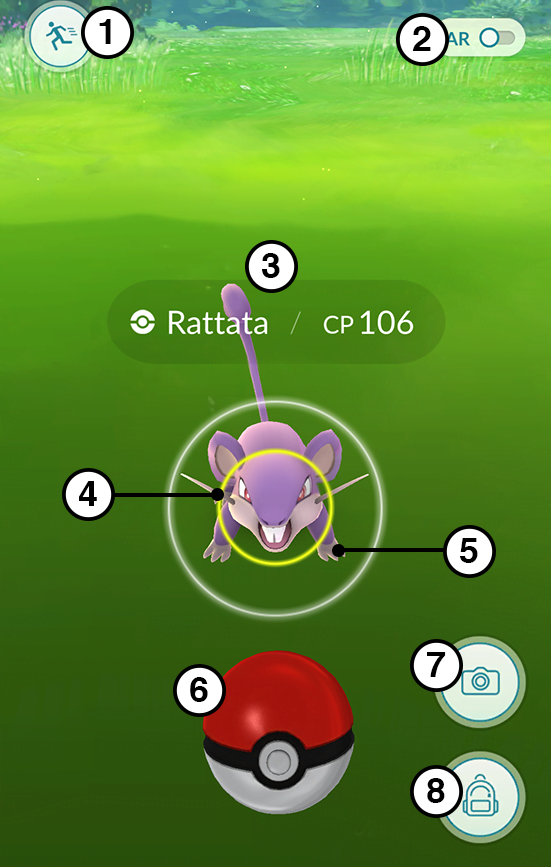
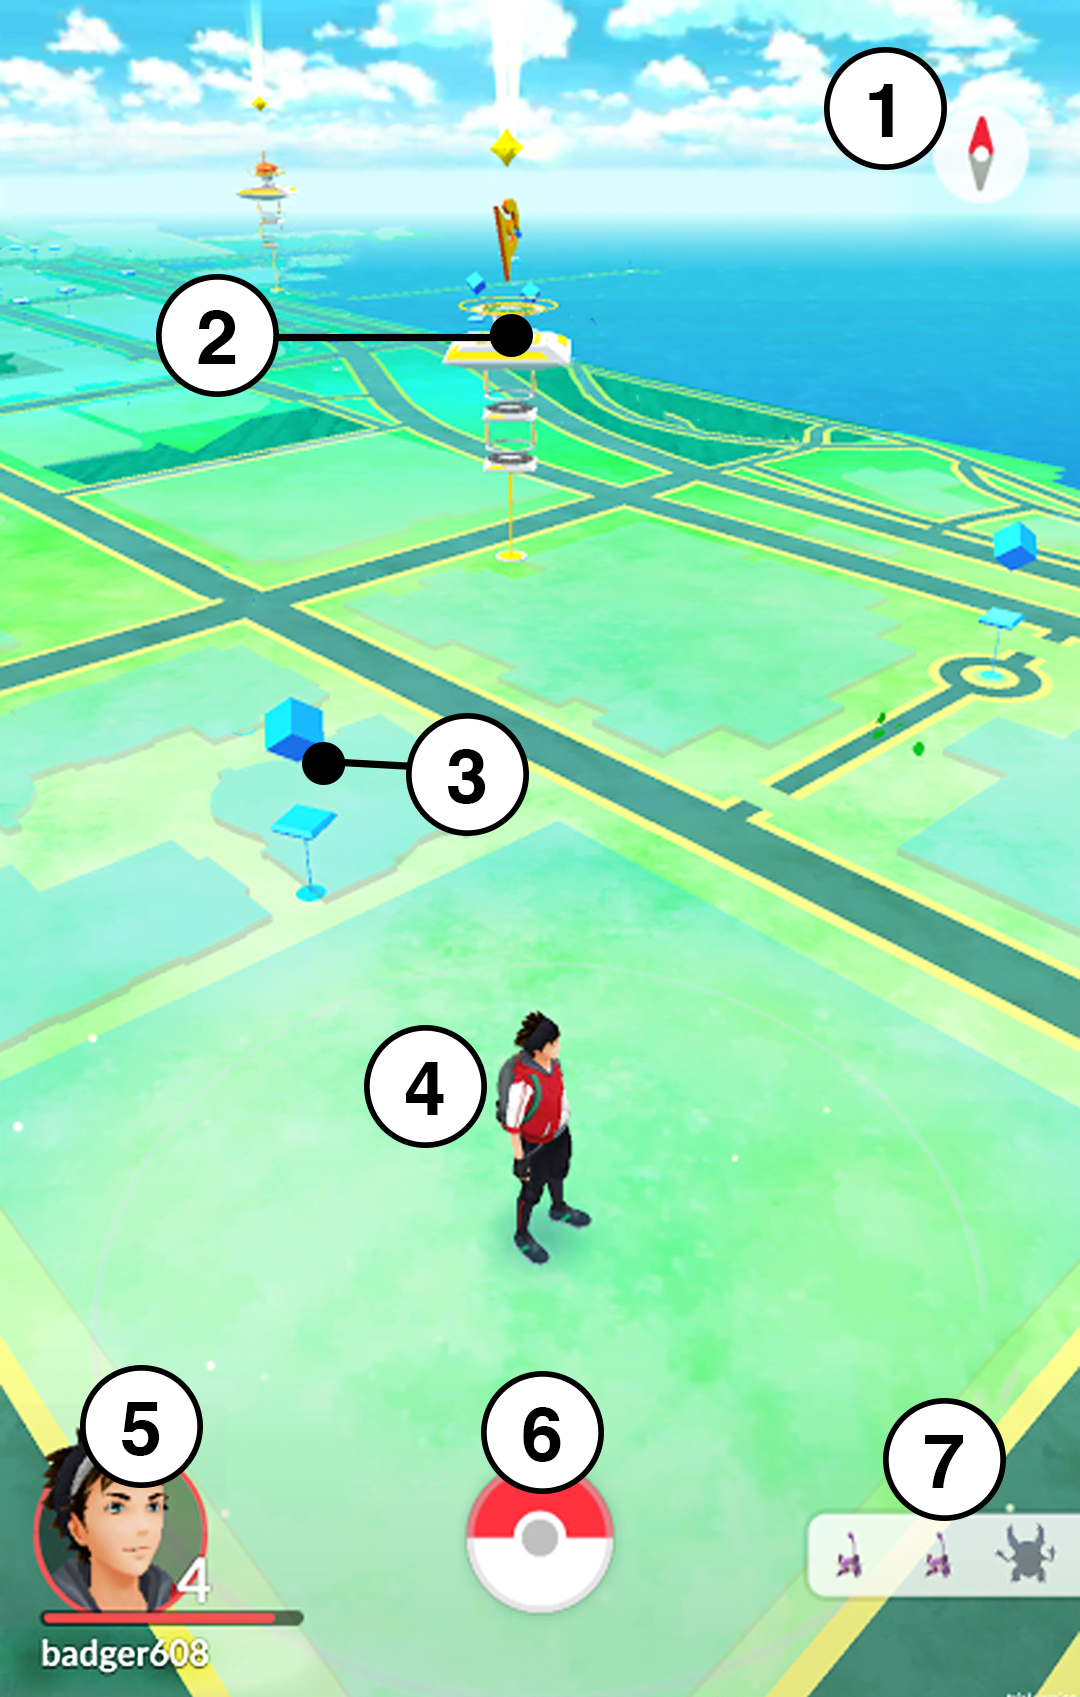
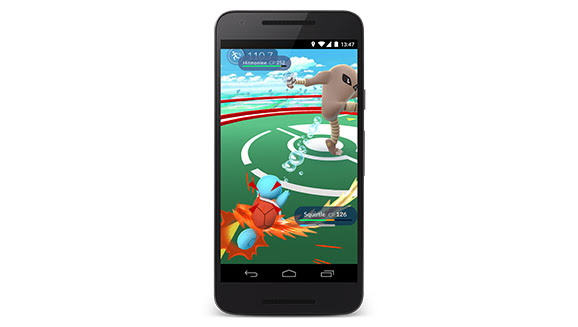
As you walk around the world, you may encounter a Pokémon on the map. Your phone will vibrate when you’re near a wild Pokémon. Tap on the Pokémon on the map to engage it in a battle.
The basic gist is to throw a Poké Ball at the Pokémon to catch it. Some timing is involved – sometimes the Pokémon will jump or move to avoid your throws, and other times perform an attack to block your attempt. To throw the Poké Ball, tap and hold on the Ball. Circles will appear over the Pokémon, one which is coloured (said colour indicates how ‘catchable’ the Pokémon is; for instance, green = easy, and red = hard) and diminishes in size.
To fling the Poké Ball, swipe upward directly at the Pokémon. You may need to use the full screen for your swipe for rarer Pokémon, as otherwise the Poké Ball will fall short. Be sure not to throw it sideways!
You only have limited chances before the wild Pokémon will run away however, so be careful. You also only have a limited number of Poké Balls! A Razz Berry item (used by accessing your Bag) will lower the chance for the Pokémon to run away.
Throw Bonuses
If you drag and spin the Poké Ball before you throw it, you can get a ‘curveball bonus’ that gives you a bonus 10 XP if that throw catches the Pokémon. It is also harder to connect with your throw with a curveball.
There are also additional bonuses achieved for striking the Pokémon within the shrinking target ring. You get a 10 XP bonus for a ‘Nice’ throw that catches the Pokémon (for when the ring is the largest size), 50 XP for ‘Great’, and 100 XP for ‘Excellent’ (ring is very small) – so while hard, these can add up.
Finding different Pokémon
If you want to find different Pokémon, you may have to walk to different areas. Note that you gain more XP/experience points when you catch a new Pokémon. You can check what Pokémon are nearby from the bottom-right hand panel of the overworld map. This selection also changes from time to time.
In earlier versions of the game a footprint icon gave you an indication how far away that Pokémon was. This has since been removed from the game. A later update may restore or add in a new tracking feature.
If you’re not interested in any that are supposedly near you, walk to a different location to help change the available Pokémon. Alternatively, wait a while – Pokémon spawn and de-spawn regularly. Also, Pokémon you see in your game can be seen by other players (and you can both catch said Pokémon; it won’t disappear for you if your friend gets it).
You may notice grass rustling animations on the overworld map as you go about. These areas supposedly have a higher density of Pokémon within them, so if you’re searching for Pokémon, check those places out!
You can view the Pokémon you have caught via the main menu. In the list view, any with a blue background are those that you have caught recently (roughly within the last 24 hours, it appears). When viewing a specific Pokémon you can swipe left or right to view another, rather than having to exit to the list view. Note that you can only store up to 250 Pokémon initially, but you can increase this number via the Shop.
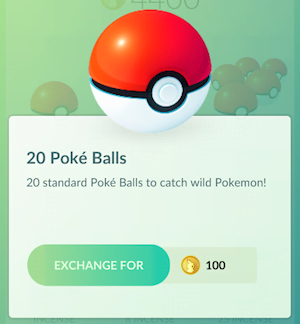
How do I get more Poké Balls?
There’s a mixture of ways:
- Finding them. You can do this by clicking on a PokéSpot (stationary locations on the map) and spinning the icon of the landmark or point of interest you have visited. You can then tap on the items that appear (e.g. Poké Balls) to claim the items.
- Levelling up. You get a few Poké Balls -and other items – whenever your trainer level increases.
- Buying them from the in-game shop.
Note that you can find other items as well, like better types of Poké Balls (Great and Ultra Balls exist), Razz Berries (which makes catching Pokémon easier), Potions (for healing Pokémon in Gym Battles), and Eggs. You get Potions and Revives after you hit level 5, as you cannot use them prior to taking on Gyms. Super Potions, Hyper Potions and Max Potions are obtainable at higher levels.
PokéStops refresh every five minutes, so you can revisit them for another 50 XP each time, as well as more items. They are purple in colour until they can be revisited.
Eggs
As mentioned above, you may find Eggs in PokéSpots. By navigating to the main menu, ‘Pokémon’, and then ‘EGGS’, you can view which ones you have. You start out with a limit of nine slots.
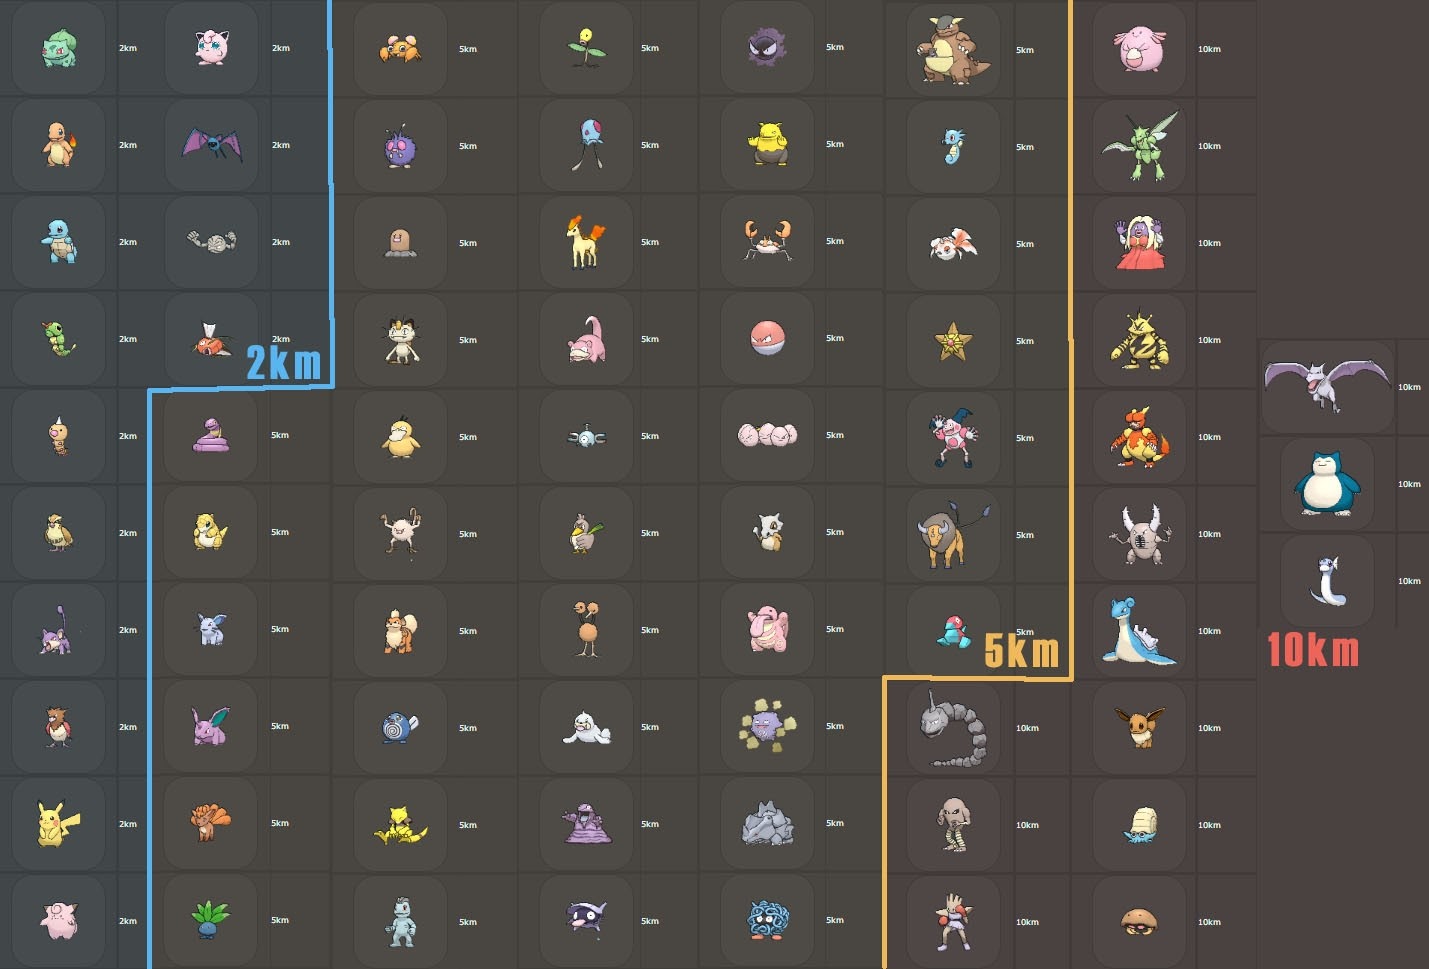
To hatch an Egg, you need to first put it in an incubator. Tap the Egg, and then ‘Start Incubation’. You can then select an incubator to place the egg in. After that, you’ll need to walk around to hatch it. Distances required are 2 km, 5 km, and 10 km. Common Pokémon hatch from 2 km eggs, and rarer, harder-to-catch Pokémon from the 5 km and 10 km. A list is below:
Note that you can only put one Egg in an incubator at a time when you start out (despite the infinity symbol below the default incubator… this refers to how long you can keep the Egg in said incubator rather than how many you have). You can buy more effective incubators later, but these have limited uses. You get such an incubator with a three-use limit at level 6 automatically, and at certain higher levels as well.

Hatching an Egg counts as obtaining a new Pokémon and will give you experience points and Stardust (used to level up your Pokémon). Note that the Pokémon GO app has to be open for your steps to be counted towards hatching that Egg!
Evolving
The more Pokémon you catch of the same species, the better! Sure, you only get 100 XP each at the minimum, but you can also evolve your Pokémon this way. Every time you catch a Pokémon, you receive Candy specific to that species (e.g. Charmander Candy).
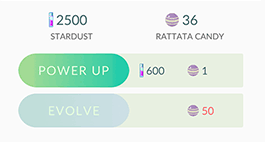
Once you get enough Candy, you can evolve your Pokémon from their status screen. Go to the main menu, ‘Pokémon’, and then click on the specific Pokémon you are interested in. You can swipe left or right to navigate between them as well. The Pokémon gains a power increase during evolution (to CP and relevant stats). Its movesets will also change.
This same menu allows you to give your Pokémon a nickname, as well as view their stats, moves, and caught location. You can also ‘Transfer’ a Pokémon to the Professor from this menu, which is the equivalent of ‘Releasing’ it into the wild from the main games. As a reward for Transferring a Pokémon to the professor, you get one Candy for that Pokémon species – so Transfer a Rattata for another Rattata Candy.
Note that the same sort of candy from the base form works on evolved Pokémon of that species line. That means to evolve a Pidgeotto, you still use Pidgey Candy, and hence there’s no need to evolve multiple Pidgey to get towards a Pidgeot. In fact, you should try to catch more Pidgey, and then Transfer the Pidgey for even more Pidgey Candy! Also, evolving a Pokémon that is fainted restores all their HP, if you want to save on your Revives.
Note also that evolution nets you 500 XP, so if you have a lot of Rattata or Pidgey, evolve them before transferring for extra XP. For a bonus, using the Lucky Egg item (doubles XP gained for a half-hour) before evolving a bunch of Pokémon is a great way to level up, as the below video shows. It’s most efficient for Pokémon like Pidgey who only need 12 Candy to evolve.
So how many Candy do you need? That depends on the Pokémon. Only 12 are needed for Caterpie, Weedle and Pidgey. 25 are required for many base evolutions of a three-line species (e.g. Machop, Bellsprout), and Eevee. 50 candy are required for Metapod, Kakuna and Pidgeotto to evolve, along with the other initially-two-stage evolutions going by the first generation games (including the likes of say Vulpix and Clefairy). The exception is Magikarp, who requires a whopping 400 pieces of Magikarp Candy. Niantic sure are making us work for Gyarados. There’s 101 Magikarp (100 x (3 + 1) = 400 candy for catching and releasing, plus one more Magikarp to be evolved).
Eevee Evolution Trick
As for Eevee, unfortunately it appears that the Pokémon will randomly evolve into one of the three currently available forms (Jolteon, Vaporeon and Flareon). There is a way to evolve it once into each of the Eeveelutions however. Naming the Eevee Pyro, Rainer or Sparky will guarantee the Eevee evolves into Flareon, Vaporeon and Jolteon respectively. Make sure to close and open the Pokémon GO app before evolving to be sure the nicknames were registered by the game’s servers.
Buddy System
One additional way to gain Candy is by having a Pokémon walk with you! Based on the species, you gain a Candy (occasionally two) every 1, 2 or 5 km walked. The Pokémon appears next to your trainer. A Pikachu or Eevee who’s walked 10 km with you will also sit on your character’s shoulder.
Check out how the Buddy System looks in the video below!
Teams
Once you hit level 5 and try to enter a Gym, you can choose from three teams: Team Valor (Red, led by Candela), Team Mystic (Blue, led by Blanche) and Team Instinct (Yellow, led by Spark). Each team is tied to a respective Kanto legendary bird Pokémon (e.g. Instinct is yellow, and has the icon of Zapdos).

Note that the official website states that you ‘cannot change Teams at this time’. Maybe this restriction will be removed later, but make sure you’ve talked to your friends which you should choose before you jump on a team!
The Team Leaders appear in the game to Appraise your Pokémon – more on that later.
How do I get to level 5 quickly?
Luckily there is a way to speed up the process and minimise the need to walk everywhere to get to level 5. In your Bag you start out with two Incenses. These attract Pokémon to your trainer – you get an encounter roughly every five minutes. Each incense lasts for half an hour, and you don’t have to walk around to get encounters to happen with the Incense!
Once you run out of them however, you’re on your own. You reportedly can get another Incense… once you hit level 5. You can also buy them from the Shop. Simply resume playing the game normally by wandering around the world and trying to encounter and catch new Pokémon, and visit PokéStops. Note that you can revisit PokéStops every 5 minutes, so that’s another method to use to inch towards level 5, 50 XP at a time.
Trainer Level-Up Bonuses
In total there are 40 levels (and you get to level 2 after catching your first Pokémon). Each level requires more XP to progress. At each level up you get items, and at certain levels item unlocks.
A list is given below of the XP required and items gained or unlocked for each level (courtesy of polygon.com):
| Level | XP Required | Items Received | Items/Features Unlocked |
|---|---|---|---|
| 1 | 0 | None | – |
| 2 | 1000 | 15 Poké Balls | – |
| 3 | 2000 | 15 Poké Balls | – |
| 4 | 3000 | 15 Poké Balls | – |
| 5 | 4000 | 10 Potions, 1 Incense, 10 Revives | Choosing a team, Gyms, Great Balls, Potions, Revives, Appraisal System |
| 6 | 5000 | 15 Poké Balls, 10 Potions, 10 Revives, 1 Egg Incubator | – |
| 7 | 6000 | 15 Poké Balls, 10 Potions, 10 Revives, 1 Incense | – |
| 8 | 7000 | 15 Poké Balls, 10 Potions, 5 Revives, 10 Razz Berries, 1 Lure Module | Razz Berry |
| 9 | 8000 | 15 Poké Balls, 10 Potions, 5 Revives, 3 Razz Berries, 1 Lucky Egg | – |
| 10 | 9000 | 15 Poké Balls, 10 Super Potions, 10 Revives, 10 Razz Berries, 1 Incense, 1 Lucky Egg, 1 Egg Incubator, 1 Lure Module | Super Potions |
| 11 | 10000 | 15 Poké Balls, 10 Super Potions, 3 Revives, 3 Razz Berries | – |
| 12 | 10000 | 20 Great Balls, 10 Super Potions, 3 Revives, 3 Razz Berries | Great Balls |
| 13 | 10000 | 15 Great Balls, 10 Super Potions, 3 Revives, 3 Razz Berries | – |
| 14 | 10000 | 15 Great Balls, 10 Super Potions, 3 Revives, 3 Razz Berries | – |
| 15 | 15000 | 15 Great Balls, 20 Hyper Potions, 10 Revives, 10 Razz Berries, 1 Incense, 1 Lucky Egg, 1 Egg Incubator, 1 Lure Module | Hyper Potions |
| 16 | 20000 | 10 Great Balls, 10 Hyper Potions, 5 Revives, 5 Razz Berries | – |
| 17 | 20000 | 10 Great Balls, 10 Hyper Potions, 5 Revives, 5 Razz Berries | – |
| 18 | 20000 | 10 Great Balls, 10 Hyper Potions, 5 Revives, 5 Razz Berries | – |
| 19 | 25000 | 10 Great Balls, 10 Hyper Potions, 5 Revives, 5 Razz Berries | – |
| 20 | 25000 | 20 Ultra Balls, 20 Hyper Potions, 20 Revives, 20 Razz Berry, 2 Incense, 2 Lucky Eggs, 2 Egg Incubators, 2 Lure Modules | Ultra Balls |
| 21 | 50000 | 10 Ultra Balls, 10 Hyper Potions, 10 Revives, 10 Razz Berries | – |
| 22 | 75000 | 10 Ultra Balls, 10 Hyper Potions, 10 Revives, 10 Razz Berries | – |
| 23 | 100000 | 10 Ultra Balls, 10 Hyper Potions, 10 Revives, 10 Razz Berries | – |
| 24 | 125000 | 10 Ultra Balls, 10 Hyper Potions, 10 Revives, 10 Razz Berries | – |
| 25 | 150000 | 25 Ultra Balls, 20 Max Potions, 15 Revives, 15 Razz Berries, 1 Incense, 1 Lucky Egg, 1 Egg Incubator, 1 Lure Module | Max Potions |
| 26 | 190000 | 10 Ultra Balls, 15 Max Potions, 10 Revives, 15 Razz Berries | – |
| 27 | 200000 | 10 Ultra Balls, 15 Max Potions, 10 Revives, 15 Razz Berries | – |
| 28 | 250000 | 10 Ultra Balls, 15 Max Potions, 10 Revives, 15 Razz Berries | – |
| 29 | 300000 | 10 Ultra Balls, 15 Max Potions, 10 Revives, 15 Razz Berries | – |
| 30 | 350000 | 30 Ultra Balls, 20 Max Potions, 20 Max Revives, 20 Razz Berries, 3 Incense, 3 Lucky Eggs, 3 Egg Incubators, 3 Lure Modules | Max Revive |
| 31 | 500000 | 10 Ultra Balls, 15 Max Potions, 10 Max Revives, 15 Razz Berries | – |
| 32 | 500000 | 10 Ultra Balls, 15 Max Potions, 10 Max Revives, 15 Razz Berries | – |
| 33 | 750000 | 10 Ultra Balls, 15 Max Potions, 10 Max Revives, 15 Razz Berries | – |
| 34 | 1000000 | 10 Ultra Balls, 15 Max Potions, 10 Max Revives, 15 Razz Berries | – |
| 35 | 1250000 | 30 Ultra Bells, 20 Max Potions, 20 Max Revives, 20 Razz Berries, 2 Incense, 1 Lucky Egg, 1 Lure Module | – |
| 36 | 1500000 | 30 Ultra Balls, 20 Max Potions, 10 Max Revives, 20 Razz Berries | – |
| 37 | 2000000 | 20 Ultra Balls, 20 Max Potions, 10 Max Revives, 20 Razz Berries | – |
| 38 | 2500000 | 20 Ultra Balls, 20 Max Potions, 10 Max Revives, 20 Razz Berries | – |
| 39 | 3000000 | 20 Ultra Balls, 20 Max Potions, 10 Max Revives, 20 Razz Berries | – |
| 40 | 5000000 | 40 Ultra Balls, 40 Max Potions, 40 Max Revives, 40 Razz Berries, 4 Incense, 4 Lucky Eggs, 4 Egg Incubators, 4 Lure Modules | – |
Gym Battles
Once you join a team, you can enter a Gym! If it hasn’t yet been claimed by anyone, when you enter it you become the owner and can set a Pokémon you have caught there. You can only add one Pokémon to each Gym, and cannot obtain it until it’s knocked off that Gym, so choose carefully!
Each Gym has a ‘Prestige’ gauge. This goes up and down depending on battles waged. Ideally, you want to have a Gym under your team’s control, and then defend against challengers to increase its Prestige. Meanwhile, you can challenge Gyms controlled by rival teams by tapping on it in the overworld map, and selecting a team of up to six Pokémon. Note that you can team up with friends and challenge a Gym at the same time.
In battling, you can either:
- Do a ‘Fast Attack’ – tap your Pokemon to perform this move. This charges your ‘special meter’.
- Dodge attacks – swipe left or right on the screen when your opponent strikes to avoid taking damage.
- Do a ‘Special Attack’ – once that special meter is charged, press and hold on your Pokémon to perform the move. This will do considerably more damage to the opponent!
A Pokémon faints when all of their HP is depleted, and a battle won when no more Pokémon remain on the opponent’s side. Damage depends on your Pokémon’s ‘CP’ (Combat Points) and their attacks. Higher level Pokémon have a higher CP rating. This number differs from Pokémon to Pokémon (even those of the same species). You gain more access to more powerful Pokémon with higher CP the higher your trainer level. However, evolved Pokémon tend to have a higher CP than un-evolved ones, and so forth. Type advantages and your Pokémon’s moveset will come into play as well.
If the Gym is under control by another player of your team, you can help out and reinforce it by adding your Pokémon to it if the level is high enough. A Gym can hold between one to ten Pokémon, depending on how much Prestige it has. For instance, a level three Gym can hold up to three Pokémon. You can also have a friendly battle at a Gym owned by your Team. Here you can only fight with one Pokémon. Knocking out at least one opposing Pokémon rewards you with XP and raises the Prestige of the Gym. You may need to beat a Gym multiple times (via lowering its Prestige) to be able to claim it for your team, and beat it multiple times to raise its Prestige so you can level it up and hence add your own Pokémon.
To heal your Pokémon, use items such as Potions (to heal HP) or Revives (to restore fainted Pokémon to a fighting condition). You can do this via the Items selection screen of the main menu.
You gain a ‘Defender Bonus’ for defending a Gym. Each day you gain more Stardust (used to level up your Pokémon) and PokéCoins (used to buy better items). You claim this bonus from the Shop (tap the shield button on the top right of the Shop menu). You get 10 PokéCoins for each Pokémon you’ve placed in a Gym, and you can claim once every 21 hours.
Appraisal System
You can check how strong your Pokémon are via the Appraisal system (unlocked after reaching level 5 and joining a Team). After selecting a Pokémon and ‘Apprise’, your Team Leader will examine your Pokémon. They’ll give you an indication to how strong they are and which stat of theirs (of HP, Attack and Defense) is the best. Stronger Pokémon will do better in Gym battles. For a full guide on the Appraisal System and understanding what your Leaders mean, check our article below!
Getting the strongest Pokémon
Typically, Pokémon hatched from Eggs will have higher stats (‘Individual Values’, or IVs for short). Higher stats corresponds to a higher cap to the CP for the Pokémon. Individual species have different base stats and CP caps as well. For example, a Dragonite can be much stronger than a Pidgeot. Moves are also crucial however.
Check out the article below for more information of getting the best out of your Pokémon, and how Pokémon stats work!
Pokémon GO: Everything players need to know about IVs and playing the “end game”
Shop
As mentioned above, you can obtain PokéCoins by helping defending Gyms for your team through a Daily Defender Bonus. You can obtain this bonus through the Shop menu (from the main menu, and then clicking on the shield icon at the top). Lastly, you can also buy PokéCoins with real money.
PokéCoins can be used to buy items. These include:
- Poké Balls. This is the only sort of Ball you can buy. You can however find Great Balls after level 12 from PokéStops.
- Incense, used for attracting Pokémon to your location.
- Lucky Eggs. These double XP gained for 30 minutes.
- Lure Module. These attract Pokémon to a PokéStop for 30 minutes. These items work for other players as well, so you can work together with friends through this item!
- Egg incubator. You can buy another slot for your Egg to stay in, but this one will break after three uses.
- Upgrades. You can buy extra storage space for your Pokémon and Items. You start out with the ability to hold 250 Pokémon, and 350 items.
Achievements
You can also get achievements, or badges, within Pokémon GO. These show up on your profile page – tap on your profile menu button from the map/overworld screen and scroll down. You can read on more information about each badge; for instance, the Kanto badge requires you to register all the Kanto Pokémon in the Pokédex, while the Schoolkid badge requires that you catch Normal types.

You can different types of medals for these achievements depending on how far you have progressed (bronze, silver, gold and platinum). For instance, you get a bronze icon for 10 Pokémon species registered. This changes to silver at 50.
Pokémon GO has frozen!
Sadly people have reported that Pokémon GO has frozen for them, particularly when catching a Pokémon. This was a game fresh out of Beta mode and still with some bugs, and one hopes Niantic will address these issues. There’s also a lot of server stress at the moment given the game released in multiple countries at once, which isn’t surprising (recall how the Nintendo 3DS eShop crashed when Pokémon Bank released). Cut your losses, close the program and start it up from scratch if your game freezes. Occasionally that Pokémon you caught may still be recorded and saved in your game.
Note also that you need to ensure you have a data connection and allow your phone access to GPS. Lastly, the game can drain your phone’s battery fairly quickly; consider charging often or investing in a power bank. There is also a power saver mode – check the Settings menu from the main menu (top right), and activate it. This simply turns the screen off if the phone is upside down (e.g. while placed in your pocket), but every bit helps.
If you have any suggestions for this guide, let us know in the comments!
Cover image by Pebbles.
Edited by gimmepie. Credit to Impo for some added details.
Videos by Achromatic. First video footage by Jake.
Originally published July 6th.