Pokémon Gold and Silver General Guide
Check out our guide for everything about Pokémon Gold and Silver, from where to find the EXP Share to getting through Ice Path!
Puzzles
Throughout Pokémon Gold and Silver, you will come across a fair few puzzles which will generally impede your progress to the next area, or contain some cool secrets! In this section, we will aim to cover all the puzzles and how to beat them.
Ilex Forest
Our first puzzle of the game (other than the Great Quiz that is “Which Starter Will You Choose?”), where the player is required to redirect a waylaid Farfetch’d back to its owner. However, this Farfetch’d won’t make it easy! This is the Ilex Forest area:
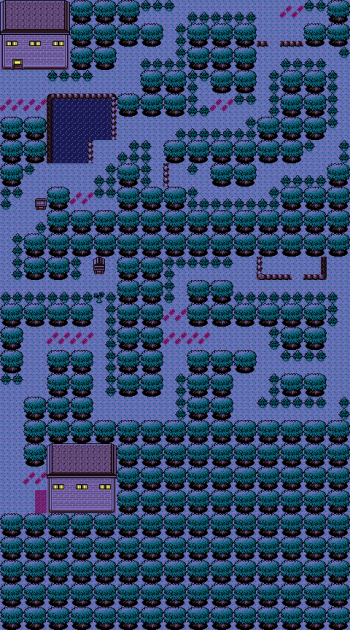
The puzzle will be taking place in the bottom half of this map. As you enter and proceed along the path, you will run into a troubled fellow who explains that the boss’ Farfetch’d has ran off, but he can’t possibly go and fetch it. Looks like a job for you! First off, take note of the loop on the right and the ledge in the northern area of it. Follow the path down and around until you reach the first fork. You will see Farfetch’d to the north.
Now firstly, approach Farfetch’d from the front. This will cause it to run upwards, however DO NOT FOLLOW IT. Instead, turn east at the fork and follow the loop around, until you eventually reach Farfetch’d from behind. Speak to it and then follow it south. This is the ‘hardest’ part of the puzzle, as it is now a single route. Speak to Farfetch’d from behind again, then follow it and speak to it once more to return it back to its owner. Congratulations, you just earned the HM Cut and solved your first puzzle!
Ecruteak City Gym
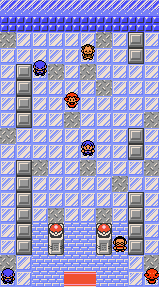
Oooooo, spooky! As expected of the Ghost-type Pokémon Gym, we’ve got a surprise in store for us – the floor is invisible! There is a route that normally you have to figure out by using trial and error, that will eventually take you to Morty. However, there is an easier way to find out there you need to go. Have a look at the map below:
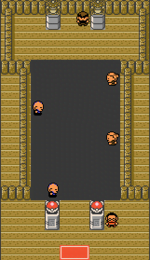
The easiest way of remembering the route is to essentially walk until you are level with the space in front of the trainer, then walk up. If remembering numbers is more your thing, you need to walk: 1 space up, 2 spaces right, 4 spaces up, 3 spaces left, 2 spaces up, 3 spaces right, 2 spaces up, 1 space left and then 1 space up. Then, proceed to go beat Morty up and get that Badge.
Ruins of Alph
In the Ruins of Alph, you will encounter the entire alphabet, oh and some picture puzzles too. These four puzzles are pictures of the following Pokémon: Kabuto, Aerodactyl, Ho-oh and Omanyte. These puzzles will have the pieces scattered around the edge and you will have to assemble them into the correct image. I won’t go into picking out exactly where each piece goes, but here are the completed images for you below:
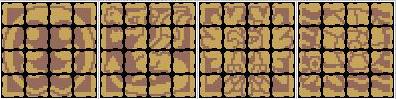 In order to access the four puzzles, you will firstly need the following HMs: Surf and Strength. The four puzzles can be found in the following areas:
Puzzle #1 – Kabuto
Kabuto can be found by accessing the cave just next to the Ruins of Alph entrance by the Research Center. Once you enter, on the right side you will read the description of the puzzle containing to be: “A Pokémon that hid on the sea floor. Eyes on its back scanned the area”.
Puzzle #2 – Aerodactyl
Once you have obtained the HM Surf (by beating the Kimono Girls in Ecruteak City), you can access the second puzzle. Head south from the entrance to the ruins to reach a small body of water. Surf across it and enter the cave you encounter. Once inside, head to the right and read the description of the puzzle, which reads “This flying Pokémon attacked its prey with saw-like fangs”.
Puzzle #3 – Ho-oh
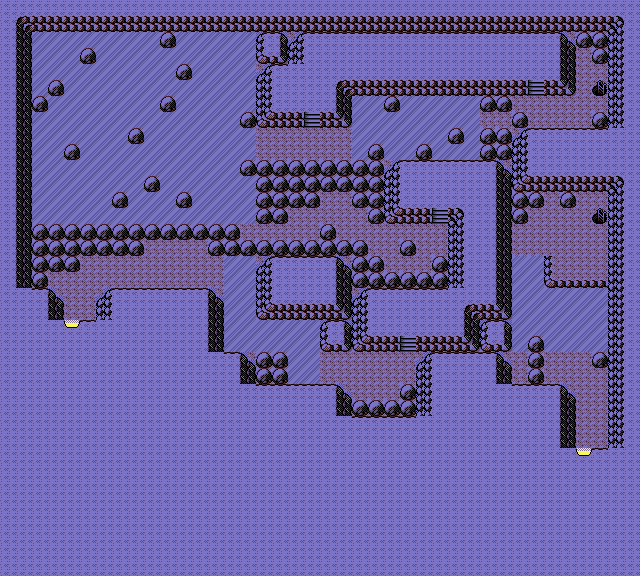
This puzzle can be found by going through Union Cave, which will again require the HM Surf and also Strength. You will need to reach the midpoint between the entrance and the exit. There will be a ladder which you can take to the next level. Once here, Surf again and take the northernmost opening to reach the next puzzle.
Puzzle #4 – Omanyte
Found in the same location as Ho-oh, however instead of heading north, head west.
Team Rocket’s Hideout (Mahogany Town)
First of all, this can only be started once you have completed the events at the Lake of Rage. Head into the building north of the Pokémon Center in Mahogany Town, to then be guided into Team Rocket’s Hideout. Here’s what the first floor looks like:
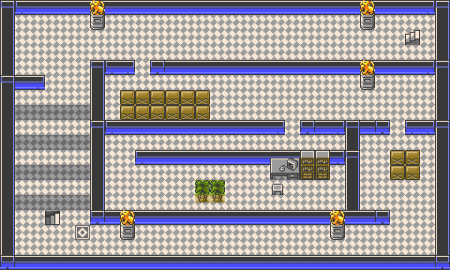
See those statues? If you walk past one, an event will trigger, causing you to fight two consecutive battles. Not nice! Let’s go and deal with that first, shall we? See the computer that’s just off-centre here? We need to make our way to that, so we can disable the statues. Hug the south wall and proceed until you reach the gap, doing the same in the next section and then following the path around until you reach the computer. Choose to either avoid or battle the trainer here, before then activating the computer and deactivating the statues along with it. Retrace your steps until you make it to the gap just above the computer and this turn RIGHT, before then following the path down and around to a teleporter space and some stairs. Go down the stairs to the next level.

You will arrive in the southwest corner of the map here, not much happens other than having a quick chat with Lance, beating someone up en route and making your way to the stairs at the southeast corner.

You will end up in this room, starting in the southeast corner. Make your way into the room immediately next to you and battle the Grunt there. Make your way up to the next set of desks and battle the Grunt there also, however make sure to speak to this one AFTER you have defeated him – he will give you part of the password needed to unlock the door on the previous floor. Exit the room and make your way west, battling both of the Grunts here and following the same procedure. You now have both parts of the password needed! Make your way to the northeast stairs, grabbing any items along the way.
You’re back at the creepy generator room, however this time you’re in the northeast corner. Simply make your way across to the other side and climb down the stairs. Appearing in the northwest corner of the next room, make your way down to the currently closed entrance and use your newly obtained password to open the door. Give the Executive a good hiding and then speak to the Murkrow to the north of the room to obtain another password, this time for the generator room. Time to backtrack all the way there! Take the stairs in the following order: northwest, northeast, southwest, southeast.
Back at the generator room, you will encounter another Rocket Executive. Make quick work of them, before then entering the generator room. You will need to stabilise the 3 Electrode on the west side, by either knocking out or capturing the Pokémon. Once finished, you’ll make your way back to the entrance of the room, where Lance will then speak to you and hand you the HM Whirlpool as a thank you for helping him thwart Team Rocket.
Mahogany Town Gym
Ah yes, the Pokémon staple puzzle, ice puzzles! Yay! As expected of the Ice-type Gym Leader, Pryce’s Gym will have you sliding all over the place to fight his Trainers and eventually him. Now there are two routes you can take, one which will allow you to battle every Trainer and then make it to Pryce himself, or you can go a much quicker route which avoids as much pain as possible before the Leader himself. Here is what the Gym itself looks like:
Here are your two routes:
Full route – starting on the east side of the left Pokéball statue, go north and battle the Trainer there. Come back south and then take one step to the east. Go north and fight this trainer, before going south again. Go to the southeast corner and fight the Trainer there, and repeat the same process in the southwest. Then go north and then north again so you are in the northwest corner, go east, and then south twice so you are next to the Pokéball statue. From here, go west and then north to battle the final Trainer, then it’s just a step to the east and you will have then reached Pryce.
Quick route – start in the southwest, battling the Trainer there. Then proceed to go north twice, east, south twice, west, north and then east to reach Pryce.
Radio Tower Basement
This is a very simple puzzle – you have three switches which will control what gates open and close. Before you start beeping away at switches and getting every one mixed up, fear not! There is a very simple solution. Clear out the three Grunts by each switch, then hit them from left to right (left, centre, right switches in that order). This will open a path to the southeast switch, which you then hit to open up the next area. If you need to reset, just walk upstairs and return back to the basement.
Ice Path
When you enter the cave, take note of the ice patch above you, since that is the first part of this cave that we’ll have to deal with. Slip over the ice patch to the right and follow the path until you reach the huge ice patch.
To get across patch of ice, you need to input the following commands:
Up, Left, Up, Right, Up, Right, Down, Left, Up, Left, Down, Right, Down, Right, Up, Right.
This should get you to the next patch of ground, where you have the option of heading up the steps or going right into another ice patch. Please do go into the ice patch, since at the end of this one is an item ball that contains the HM Waterfall, which is needed to access the Pokémon League later in the game. To get to the item ball, follow these directions:
Right, Up, Left, Down, Left, Up, Right. Getting back should be trivial.
Next, head up the steps and follow the path to a ladder that takes you to the next floor (which is down).
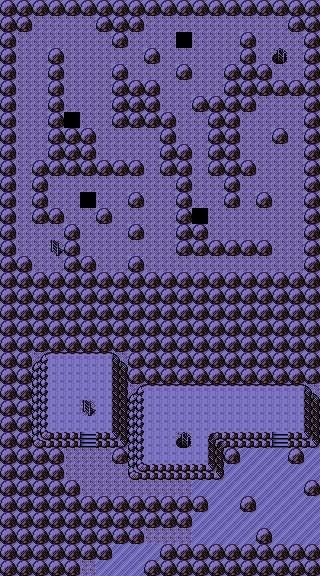
On the second floor, you’ll see a bunch of holes as well as a bunch of Strength boulders. The goal for this floor is to push each of the boulders into a different hole in order to navigate the ice patch in the floor below.
There are four boulders here, and each should go into a specific hole.
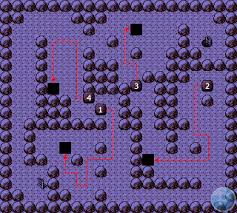
Follow the steps in the picture, and you should be good to go. The next floor below will be trivial to navigate if you have pushed all of the boulders down. After this floor, you will reenter the second floor.
Upon revisiting the second floor, you will reach a patch of ice upon heading right. Now, there are two “exits” to this patch of ice, both to the left. One is higher than the other. The higher one leads to the exit, while the lower one leads to an item ball (containing [item]).
If you would rather ignore the item ball and head straight to the exit, then go:
Down, Right, Up, Left, Up, Left, Down, Left.
To get to the item ball, go:
Down, Right, Up, Left, Down, Left, Down, Left.
There’s a small patch of ice before you can reach the item ball, but travelling across is trivial. Now, to get to the exit from the item ball through the larger patch of ice, go:
Right, Up, Right, Up, Left, Up, Left, Down, Left.
Walk a bit and you should reach the exit.
Blackthorn City Gym
When you enter the Gym, head northwest and battle the Trainer, then go north and use the stairs there. On the upper floor, go southeast through the narrow path and beat the Trainer. In the southeast corner you’ll see a couple of boulders. Push the eastern one all of the way to the south, then use that space to get behind the other one and it all of the way north and then into the hole. From there, continue north and defeat the Trainer, then look to the east to see another pair of boulders. Push the nearest one all of the way east and then push the other boulder into the hole.
Back to the south, closer to the first hole, you probably saw some stairs. Descend using them to reach the first floor again, then defeat the nearby Trainer. Go north and cross the Strength boulder, then head north to find another Trainer. After defeating them, cross the next boulder and speak to the girl on the platform there – the eighth and final Gym Leader of the Johto region, Clair!
Edited by bobandbill, Jake and SirBoglor. Puzzles section written by Rabinov and 5qwerty.
Screenshots from the excellent Pokémon Crystal Let’s Play by Crosspeice.