
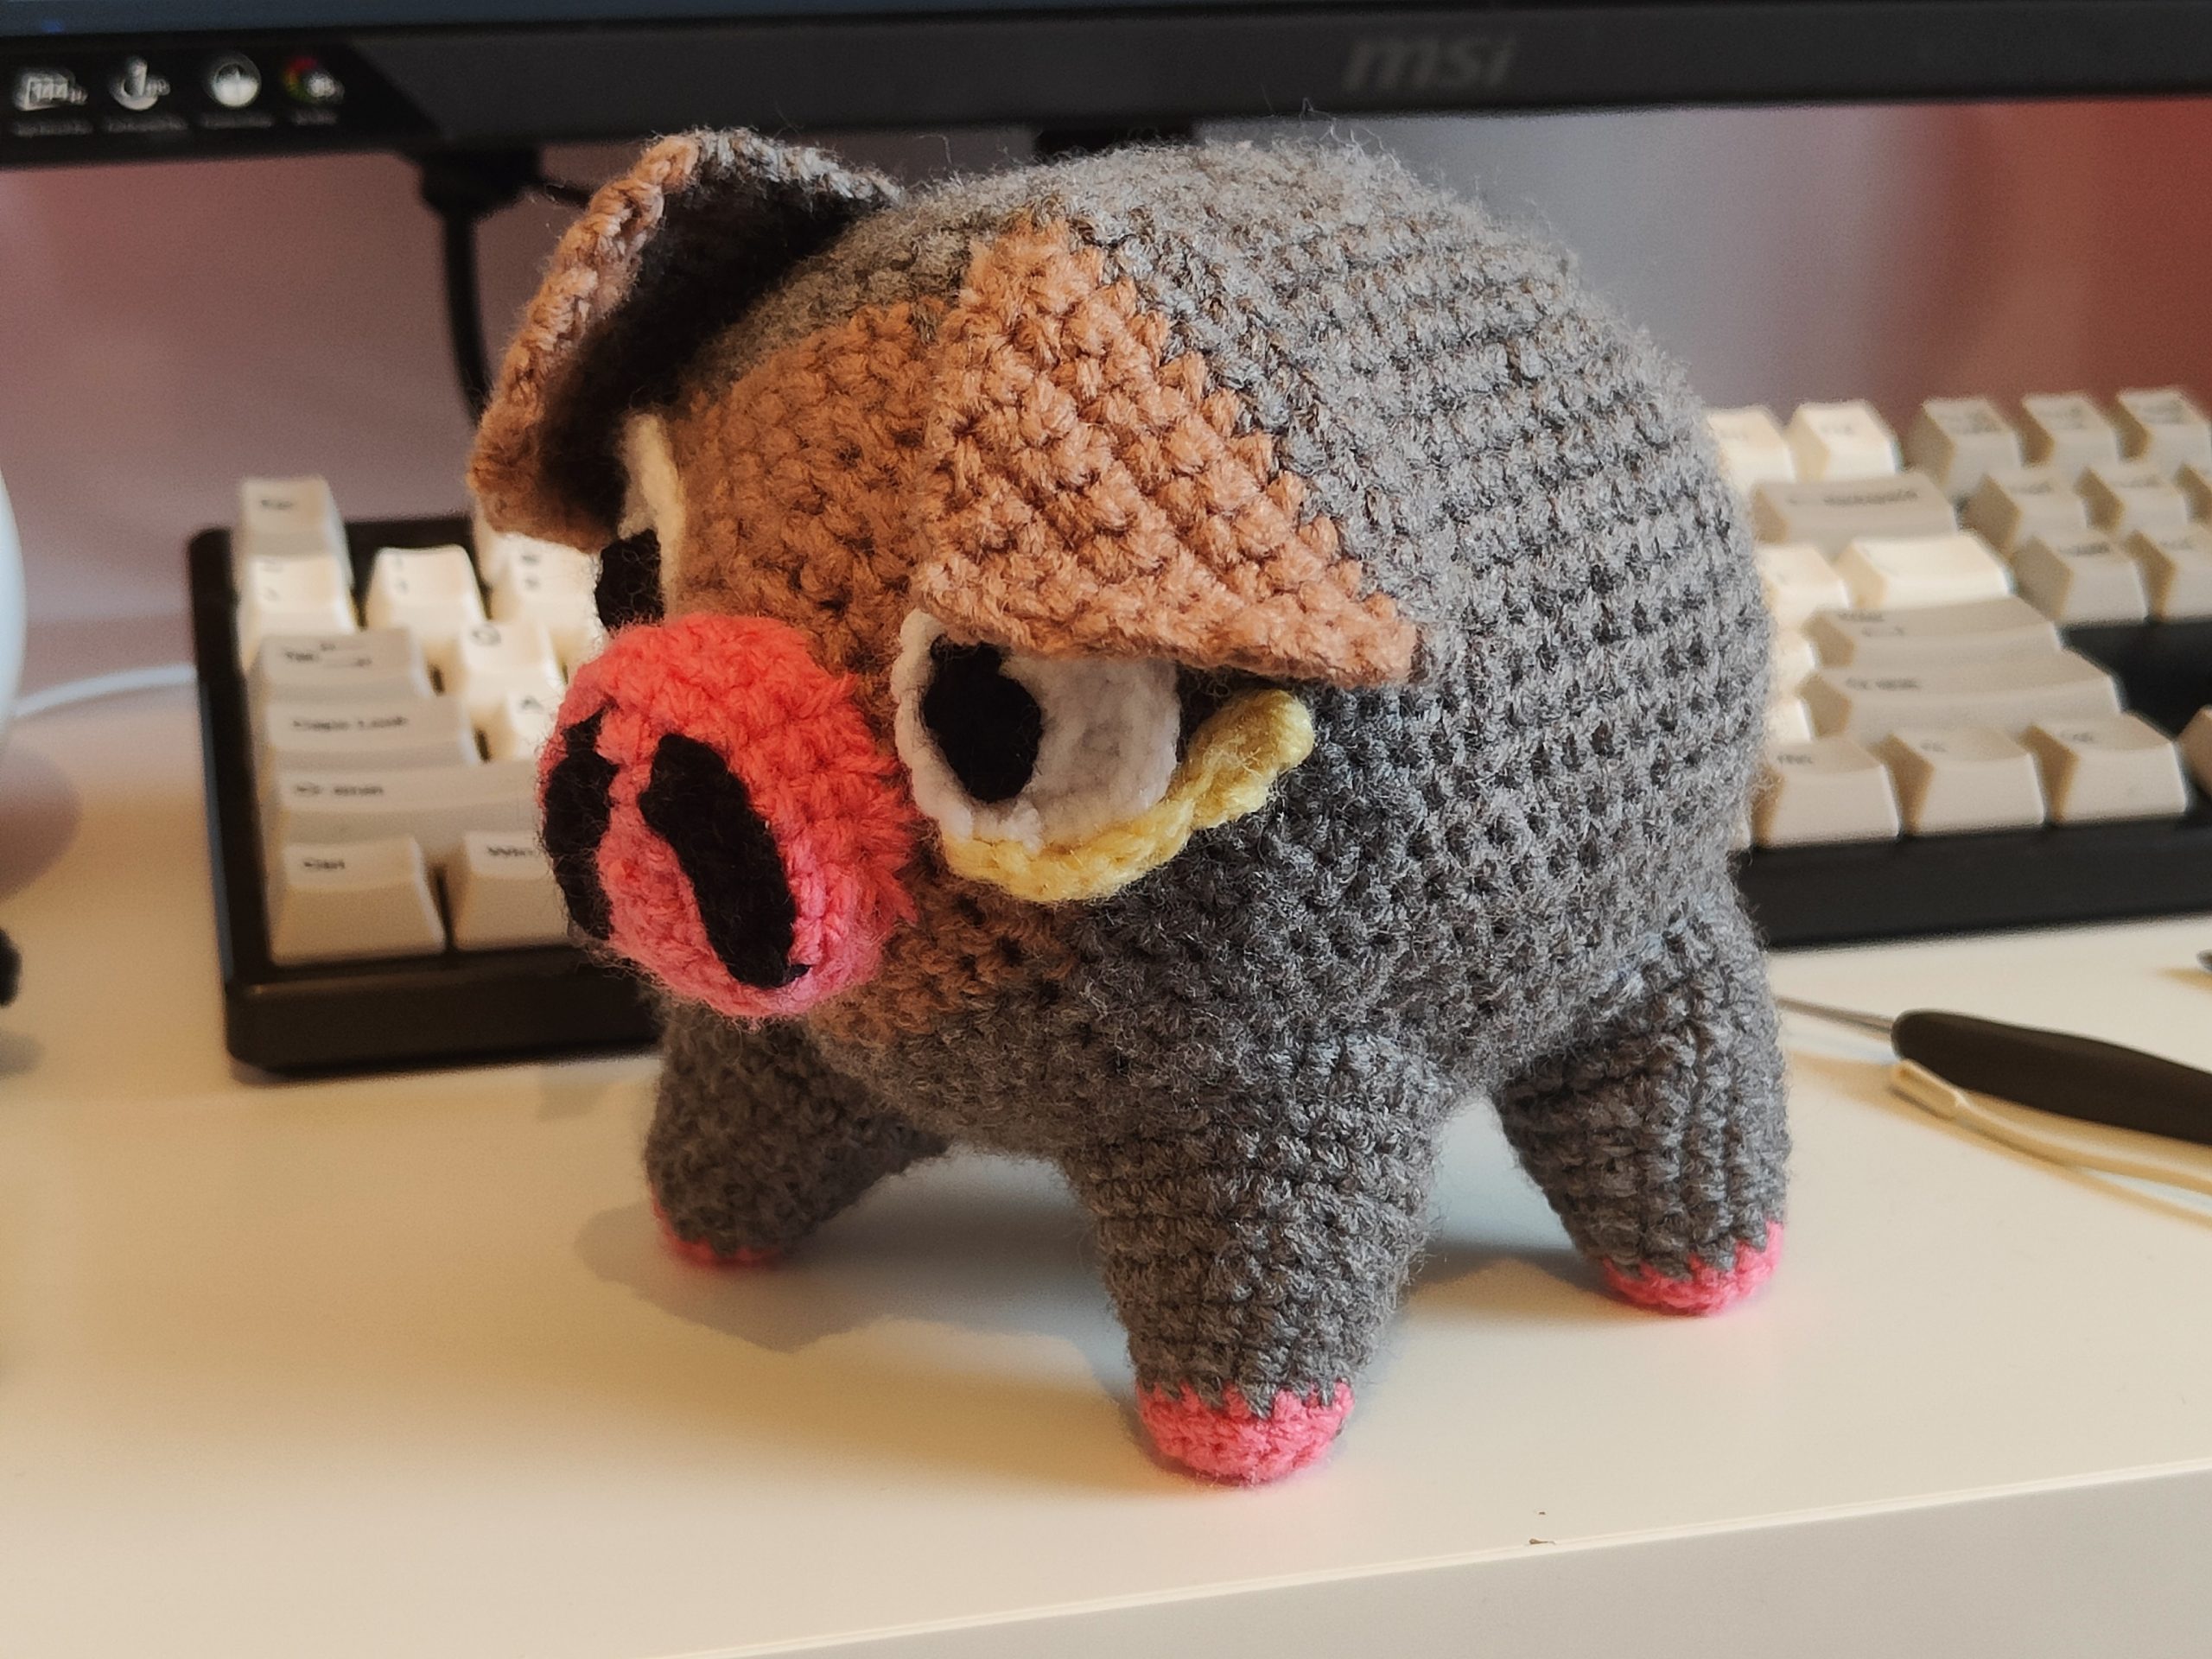
Lechonk Crochet Pattern
Learn how to make your own Crochet of Lechonk with our step-by-step guide!
With the announcement of Pokémon Scarlet and Violet came the inevitable love and hype for the introduction of our newest region’s local pig Pokémon, Lechonk. While Scarlet and Violet don’t come out until later this year, the good news is you don’t have to wait to catch a Lechonk – because I’ve written a step-by-step guide on how to handmake your very own crochet Lechonk plushie!
Materials and Methods:

- Yarn: Weighted for 4 mm in colours charcoal, light brown, pink, white, black, and lemon
- Hooks: 3.5 mm and 2.5 mm
- Yarn needle
- Scissors
- Stuffing
- Techniques: Magic circle, single crochet, increasing and decreasing proportionately within rounds, yarn changing, tying off, yarn sewing
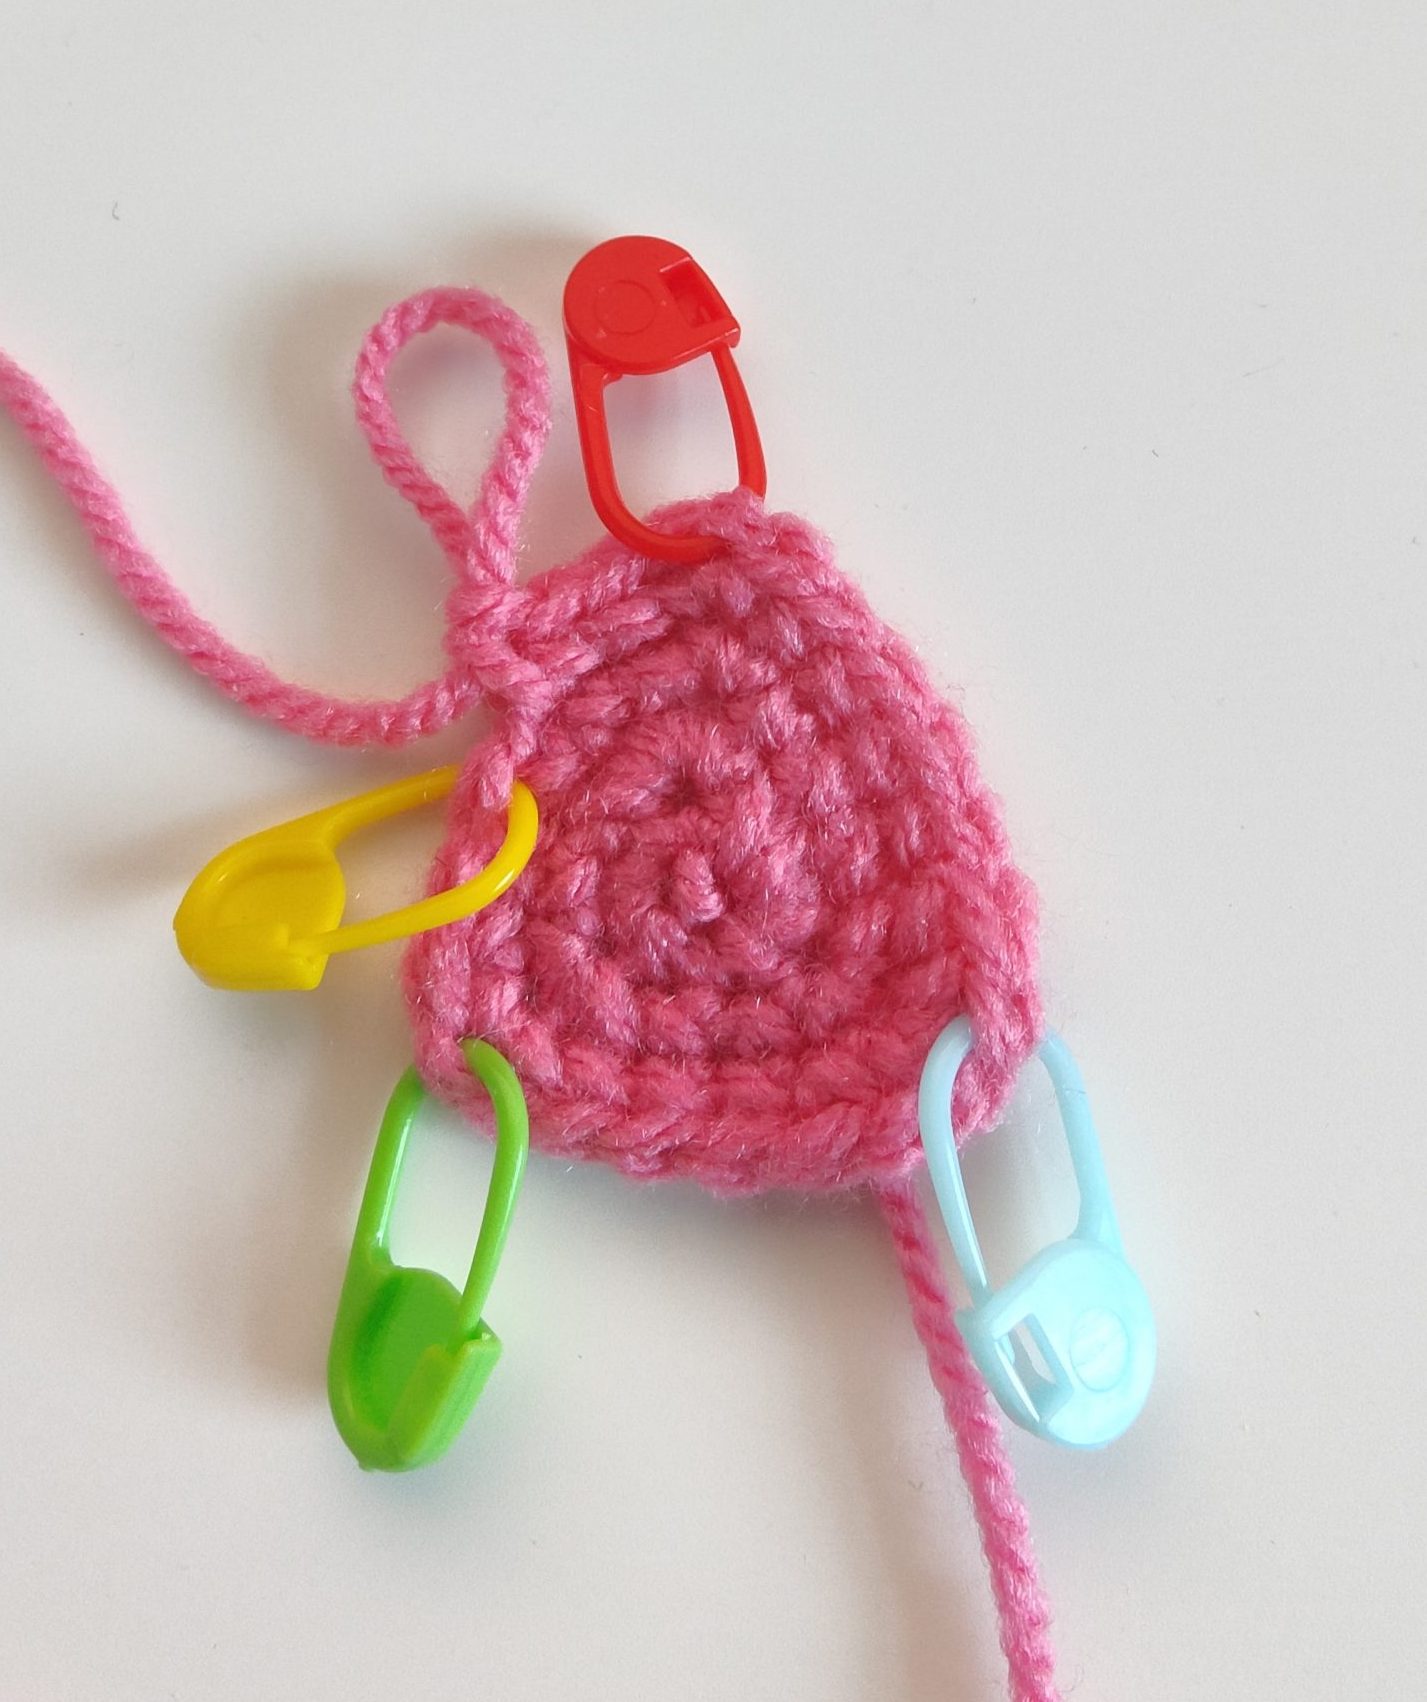
- Don’t forget your stitch markers! ♡
This is an advanced pattern that combines a lot of techniques such as single crochet, rounds, partial rounds, a bit of freehand, and tactfully combining stitches to bring shapes to form. If you’re brand new to crochet, I suggest this very slow demonstration of the single crochet technique, because it can be hard to tell what you’re looking at when you’re first starting out – trust me, I know!
Glossary:
CH – Chain
ST – Stitch
SC – Single crochet
Inc – Increase
Dec – Decrease
{x, x, y,}*n – You’ll be repeating what’s in here times the following number; so if it says {2, 1, 1, …} it means you’ll single crochet twice in the following stitch, then only one in the following 2 stitches, then 2 in one again, so on and so forth, for number of (n) times.
~~
Body:
Starting with 3.5mm hook – Row 1: CH 6 in magic ring
Row 2: SC 2 in each st (for total of 12)
Row 3: SC 2 in 1st st, 1 in 2nd st, 2 in 3rd st, 1 in 4th, 2 in 5th st, 1 in 6th (for a total of 18)
Row 4: Same pattern but adding 1 sc between double st, so {2, 1, 1…}*6 (for total of 24)
Row 5: Same as above, adding one more between your increases, so {2, 1, 1, 1…)*6 (for a total of 30)
Row 6-10: Etc. By row 10, you should have 60 stitches
Row 11-25: Put on a YouTube video and sc through each row of 60, 15 times
Row 26: Decrease by 6 in opposite pattern as original 10 rows, dec 2, {sc 1}*9, until end of row
Row 27: Dec 2, {sc 1}*8, until end of row
Change yarn
Row 28-35: Etc.
Stuff & close!
Legs (x4):
Hoof:
Changing to 2.5 mm hook – Row 1: SC 6 in magic ring
Row 2: SC 2 in each ST (12)
Row 3: SC 1 in previous 6 st (this raises the front of the hoof and creates the little toe)
Leg:
Change yarn
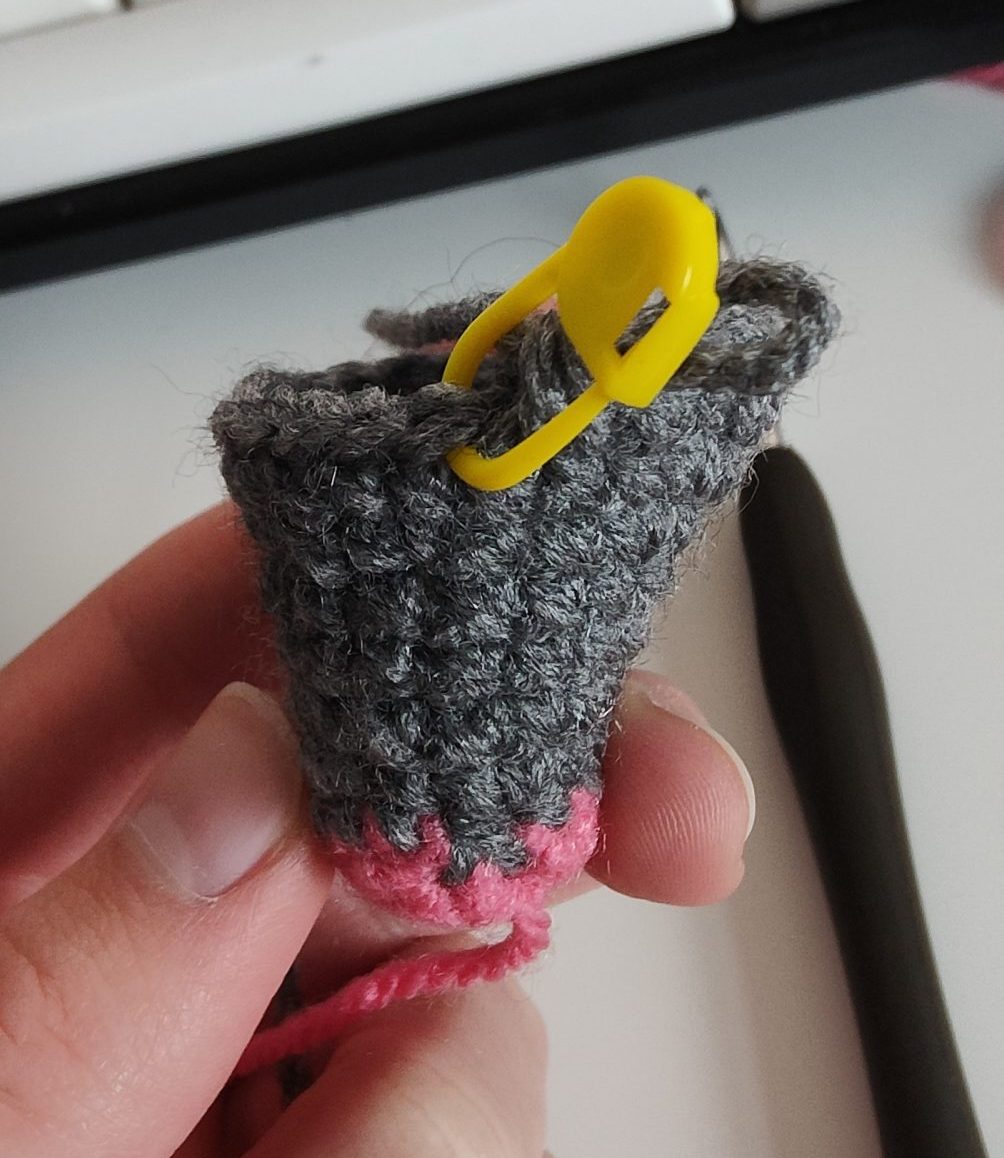
Row 3 (cont.): SC 6 in rest of foot pad (for a total of 12)
Row 4: SC in next 7 st, {sc 2 in next st, sc 1 in next} x2, sc 2 in next (completes round, for total of 15)
Row 5: SC in next 15 st
Row 6: SC in next 7 st, {sc 2 in next st, sc 1 in next 3 st} x2 (completes round, for total of 17)
Row 7: SC 1 in next 17 st
Row 8: SC next 8 st, {sc 2 in next st, sc 1 in next 2 st} x3 (completes round, for total of 20)
Row 9: {SC 2 in next st, sc 1 in next 3 st} x5 (completes round, for total of 25)
Row 10: SC 1 in next 25 st
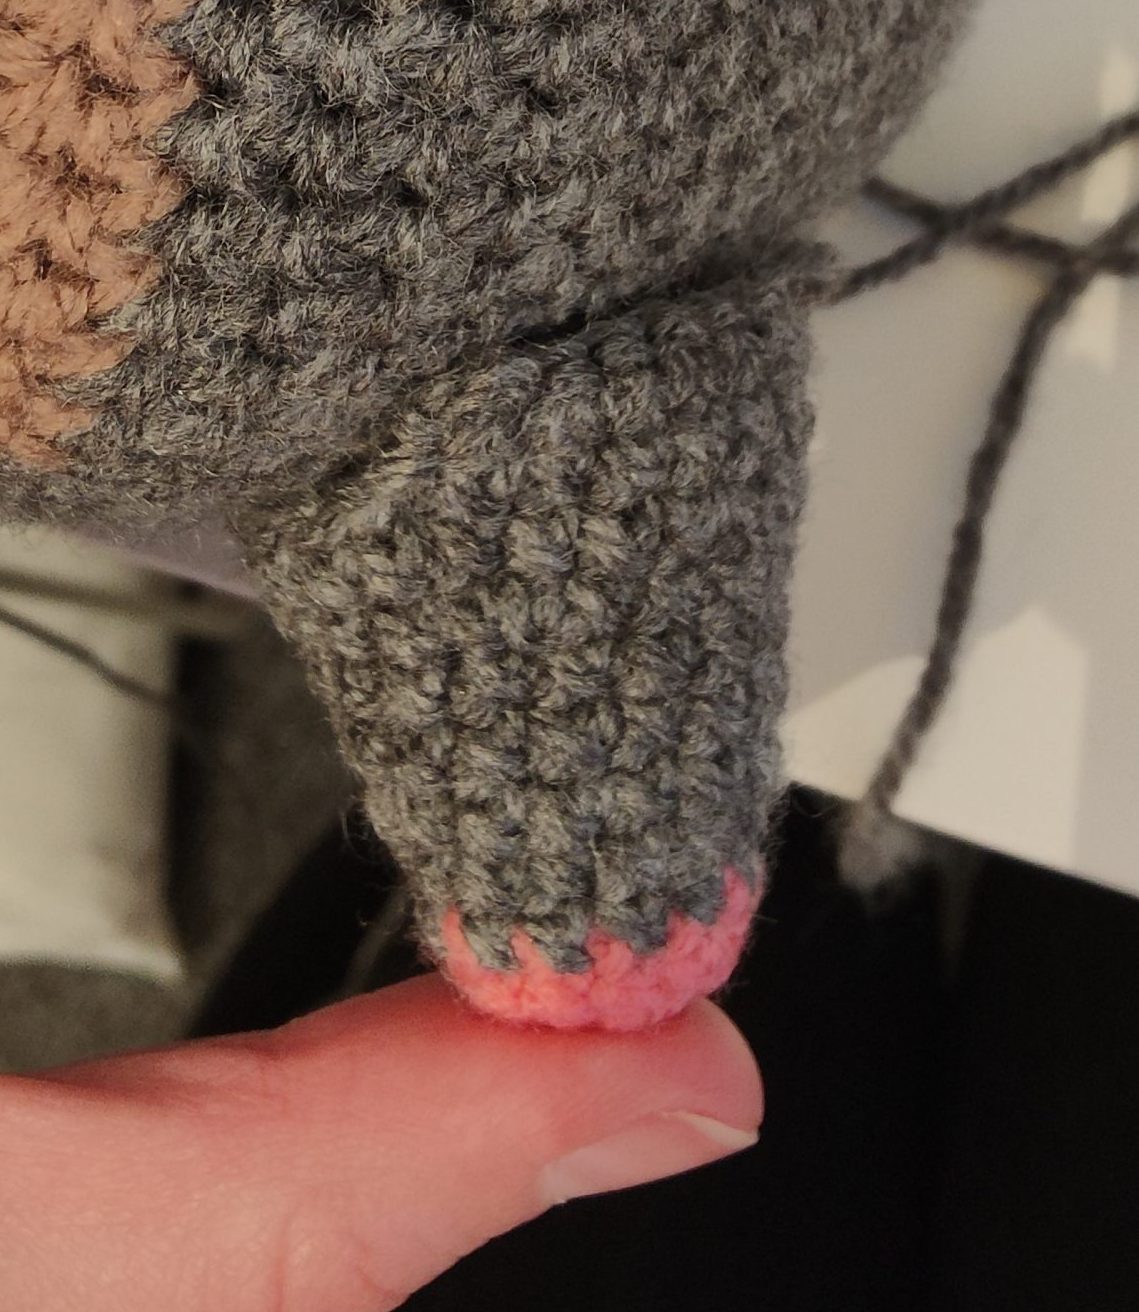
Row 11 & 11.5: SC in next 15 st, turn and sc again in same 15 st (This creates the taper for which the leg will be attached to the body)
Tie off and leave a long tail for sewing onto the body!
Note: For the two legs on the left, put the taper on the opposite side!
♡
Snout:
You’re going to form a triangle by adding 3 stitches in each corner stitch, which you start by increasing the middle (3rd) of each of the 5 you put in the original 3 stitches you chain at the beginning. Then as you work in the round, sc 3 in the 2nd st of the 3 you increased by in the previous row.
(This is handy for making bigger triangles of a chosen size, but for the sake of this pattern, I have each row laid out)
~~
Row 1: CH 3
Row 2: SC 5 in first st, put a marker in the 3rd st, then repeat for the 2nd and 3rd st (for total of 12 st). This creates a round.
Row 3: SC 1, sc 3 in next st (put a marker in the 2nd st), sc 2, sc 3 in next st (mark 2nd st), sc 3, sc 3 in next st (mark 2nd st), sc 2

Row 4: sc 2, sc 3 in next st (the marked st), sc 4, sc 3 in next st, sc 5, sc 3 in next st, sc 3
Row 5: sc through the row
Row 6: SC 2, combine the next 2 st, sc 6, combine next 2 st, sc 6, combine next 2 st, sc 3
Row 7: SC through the row
Tie off and leave a long tail for sewing.
Pseudo-embroider the nostrils by slipstitching through the front.
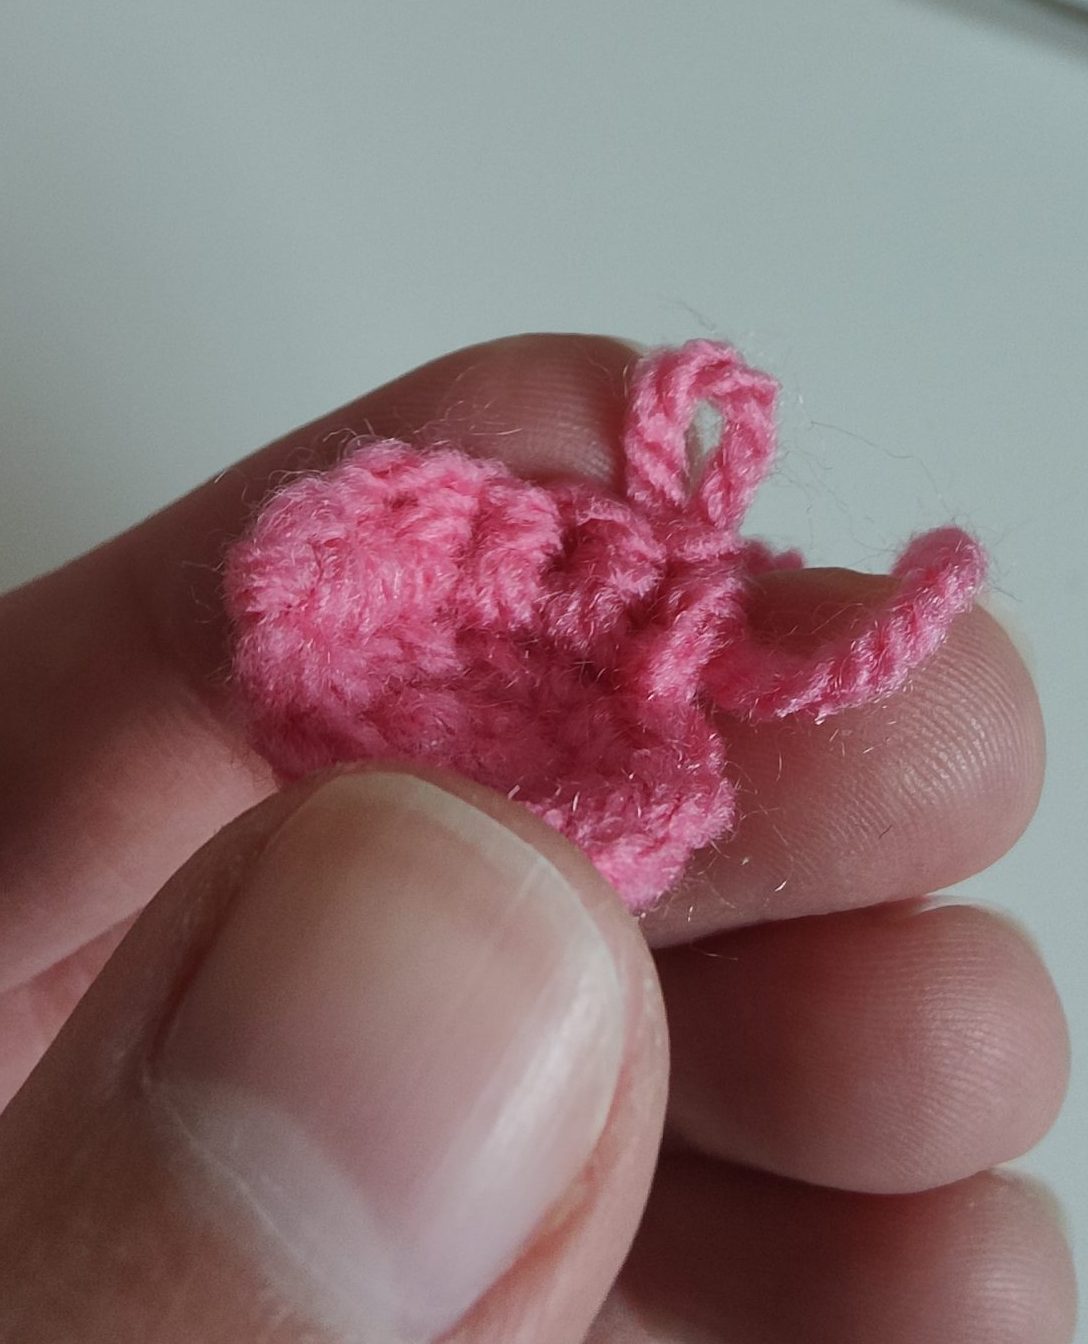
Eyes (x2):
Whites:
Row 1: CH 4

Row 2: SC 1 in second st from hook (the 3rd st you chained), and third st. sc 3 in 4th st (mark the 2nd), sc 1 in next st, sc 3 in next st (mark the 2nd), sc 1 in next 3 st
Row 3: SC 3 in the following marked st (mark the 2nd), sc 1 in the next 3 st, sc 3 in the marked st (mark the 2nd), sc 1 in next 5 st
Row 4: SC 3 in following marked st (mark the 2nd), sc 1 in next 5, sc 3 in the marked st, sc 1 in the next 7 st
Tie off and leave tail for sewing.
Pupils:
Row 1: CH 3
Row 2: SC 1 in second st from hook, sc 2 in next st, sc 1 in next st
Tie off, sew on to the white oval applique from before
Eyelids(…?):
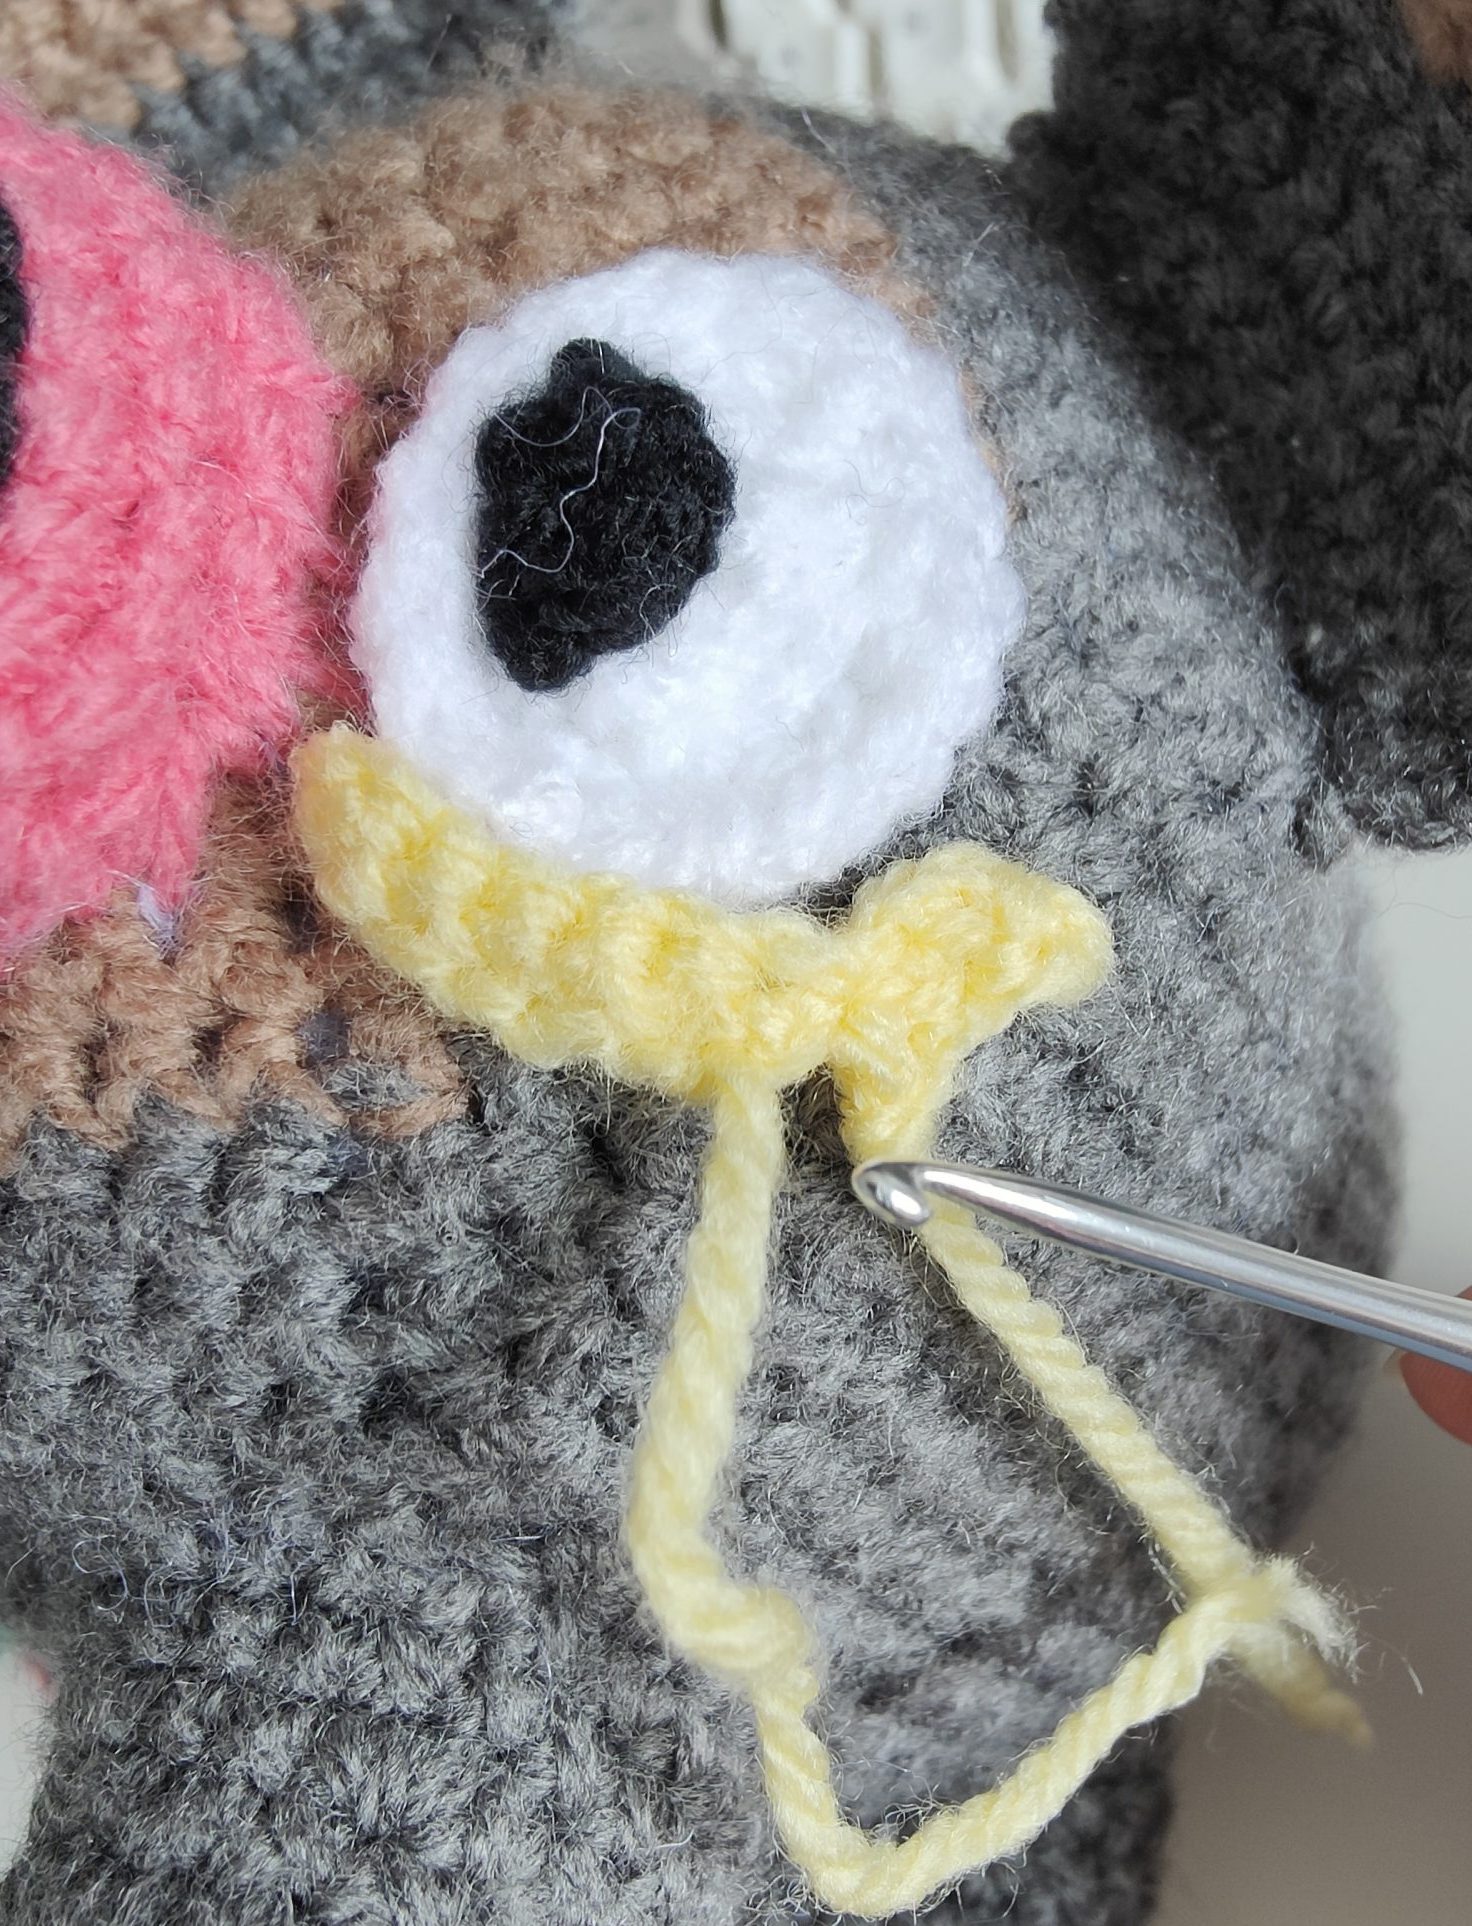
Row 1: CH 6
Row 2: Turn and sc 1 in previous 5 stitches, starting from the second one from hook, sc 1 in the very first stitch you chained, then ch 5 more
Row 3: Turn and sc in previous 3 st, starting with the second one from the hook
Tie off!
Ears (x2):
This time, you’re actually going to start with a long tail at the beginning, rather than leaving on at the end for sewing.
Row 1: CH 14
Row 2-6: SC 1 in each 13 st starting at the second st from your hook, ch 1 at the end
Change yarn
Row 7: Start your ch 1 with this colour, sc 1 in the next 11, combine the last 2 st
Row 8: SC 1 in the next 10 st, combine the last 2 st
Row 9: SC 1 in next 9 st, combine the last 2
Row 10: SC 1 in the next 8 st, combine the last 2
Row 11 – 15: So on and so forth
Row 16: (There should be 4 stitches left) Combine stitches 1+2, and 3+4
Tie off, sew the long tail down through the edges for a smooth disappearance.
Tail:
Row 1: CH 21
Row 2: SC 1 in the previous 20 starting from second stitch from hook. Tighter stitching here will ensure your little tail has a nice curl to it!
Tie off!
♡ Your Lechonk is now ready to be assembled! ♡
Using the yarn needle, sew the long tails through the stitches onto the main body. You can use a second needle or stitch markers to keep your parts in place, so they don’t get moved around during the sewing process to ensure they’re placed exactly where you want them to be (and stay put). Don’t forget to stuff the legs before tieing them off to your body portion!
This pattern is available as a free, downloadable PDF on my ko-fi page.
Edited by Aldo, Arcaneum, bobandbill, and Sheep.