ROM Hacking Tools – Part 1: AdvanceMap
Check out this guide to AdvanceMap for beginners!
This is the first part of the ROM Hacking Tools series. This series is for those of you who are completely new to ROM hacking and will aim to help you better understand how some basic tools work. Today I am going to explain some features of the tool “AdvanceMap”, one of the most basic tools. Check out the AdvanceMap thread on PokéCommunity for further information!
Instructions
First, we must open the ROM (FireRed, Emerald etc) in AdvanceMap. To open the ROM go to “File” -> “Load ROM…” and select your ROM.
After this, we can see three options on the left: “From Header“, “Connection List“, and “Map Files“. We are going to work on the “From Header” option – go ahead and select it.
Now we see some numbers on the left. Each one of these is a folder that contains some maps. The most used folder is the number three (3) folder, which contains most of the major area maps of the ROM. Before we start, I suggest you to go to “Settings” -> “Viewing size” and check all the boxes there.
Okay, it’s time to select a map. I’m going to use Pallet Town (3.0). Now, let’s go over all the tabs above the map.
Map Tab
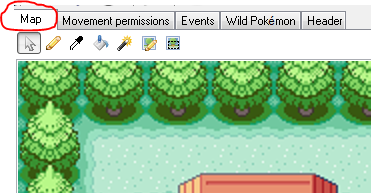
This is pretty obvious – we can build or edit maps at this tab. You can select blocks to add into the map from the right.
Above the blocks list you will see something named “Border Block“. This is actually the border we see at the end of the map. We usually use tree or cave tiles as a border block.
Movement Permissions Tab
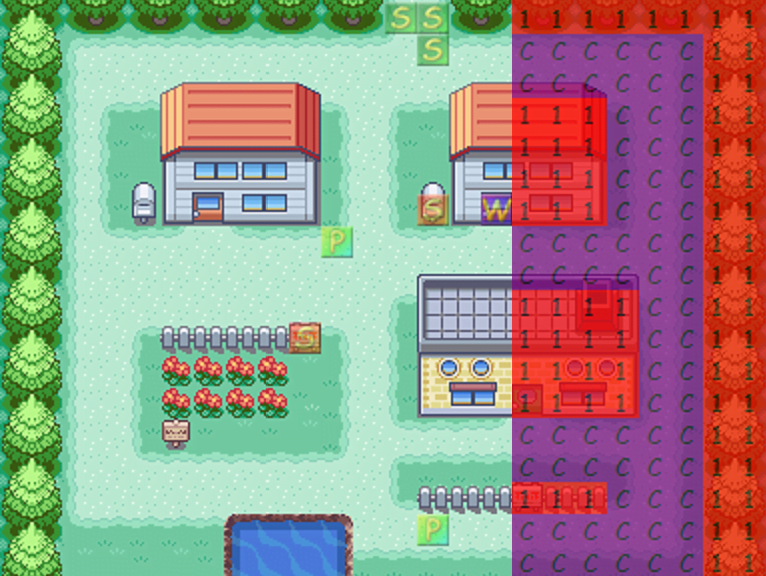
In this tab you’re going to see a lot of numbers or letters. Each number represents a movement “type” for an area in the map. I’m going to explain the most common and most basic ones here
- First of all, the “1“. You are unable to walk through this one (for example, wall, tree, etc.).
- “C” is walkable, so you can move through this one (for example, ground and floor).
- “4“. We use it at the surface of the water, you can use surf with this code.
- “0” is for stairs and caves entrances.
Events Tab
 Events are divided into 4 types: “Warps“, “Person“, “Signposts” and “Scripts“.
To add an event, you need to raise the value at the right (Number of Persons, Warp, Sign, Scripts) and then, tap “Change Events“.
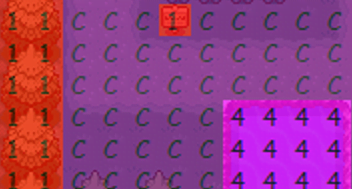
Warps: I think it’s pretty obvious what a warp does; it has the ability to warp the player to another location.
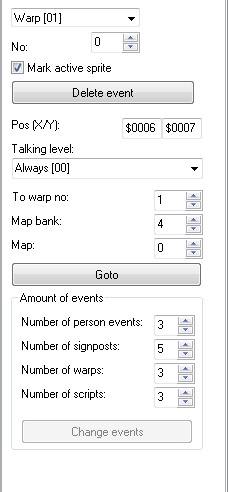
If we select a warp, we can see some information about it on the right.
- “To warp no“: As we see in the photo above, each warp has a number. That means that the player is going to be warped in each warp you want by setting the warp’s number.
- “Map Bank“: It’s the map’s first number, so if you are using Pallet Town the Map Bank is 3.
- “Map“: is the other number, so in our case it’s 0.
Person events: First of all, a person event doesn’t mean that this will be a person. It can be a Poké Ball item on the ground, a tree blocking your way or a boulder.
When you select a Person Event you are going to see a window like that displayed to the right. Now, let’s explain all of these.
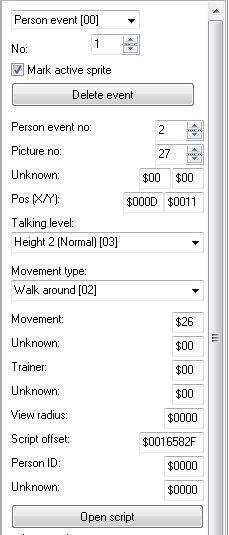 “Person Event No”: Is actually the person ID, you need to know this when you’re making scripts.
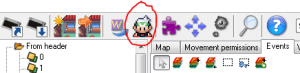
- “Picture No”: Is the sprite (or the image) that will be shown in the map. (Note: If you can’t see the sprites, click this:)
- “Pos (X/Y)”: Is just the X and Y coordinates of the person event.
- “Movement Type”: You can see some movements to choose for the sprite to do. Just select whichever you like.
- “View Radius”: Is how far a person can see if they are a trainer.
- “Script Offset”: You are going to put the offset of a script there after compiling it.
- “Person ID”: Is the flag you use on a script. Note that “Scripts” and “Signposts” should be explained on a scripting tutorial.
Scripts and Signposts: I’m going to explain these in another article along with simple scripting
Wild Pokémon Tab
There aren’t many things to explain here.
“Type” is the method of finding wild Pokémon. (Grass, Surfing, etc.)
“Encounter Ratio” is the chance of finding a Pokémon in the wild.
Header Tab
“Name”: You can change the name of a map.
“Map Options”: Here you can change the weather. There’s other options to toggle such as music.
“Map dimensions”: You can change the width as well as the height of a map.
Map script and Used tilesets will be explained in another article.
Conclusion
This is the end of the first part of the series. Don’t forget! This is for those who are new to ROM Hacking.
Stay tuned for a second part coming soon!
Edited by 5qwerty, bobandbill and Volpe Artica.